Stew's 2002 National RV Splash Travel Trailer Restoration
Let's Start At The Beginning...
(29 June 2012)
This all started when I was offered a 6 month contract at LiveTV in Melbourne,
FL back in late June 2012. It's good news since I've been looking for work since
my contract at EA Sports expired at the end of April, but the bad news is I live
in Orlando, FL... about 90 miles from Melbourne. Well, maybe it's not such bad
news. My parents have a travel trailer I can stay in during the week, and just
drive back home for the weekends - or so we thought...
Some history is in order... My parents have a membership at Thousand Trails, a travel trailer resort near us in Orlando, where they tow the trailer for the Summer. We enjoyed spending some time there every year, and my son, Nick, would stay for a week or two. The last time Nick even rode back to Palm Bay with his Grandpa, but something went wrong with Dad's brake controller, and the truck brakes overheated and locked up. They spent some time waiting for them to cool off and were then back on their way home... after a quick adjustment to the brake controller that is.
There's a lot that happened in between, but the short story is the trailer was loaned out to some folks that needed a place to stay. Like most folks that Mom tries to help out, they can't take care of themselves, let alone a trailer. A trailer that doesn't belong to them, so why would they care? A trailer they're staying in because they can't afford a place of their own, and in fact, lost the place they had. Well, when it came back, it had a hole in the floor of the slide out section. A hole you can see through to the ground. So, at this point, that's all I know.
I first tried to fix up the trailer last September (2011), while Mom and Dad were on a four day cruise. Unfortunately, I couldn't get anywhere near it. Besides the tall weeds, sawgrass, and pepper trees surrounding it - the ones that Dad was supposed to mow down - the agressive bee colony that made their home underneath the front of the trailer was the real issue. I tried using one of those cans of flying insect killer that shoots a 20' stream - didn't even slow them down - and I still couldn't get any closer than 10' without having a dozen "guards" attack me.
Well, that was the end of that, it was time to call in the professionals. By then, I was back to work at EA, and nearly a 55 gallon drum of beehive and $300 later, the time to get it done while I was out of work and before Summer got here had already passed. I felt bad about my parents spending the money to have the bees cleared out and then not be able to work on it, but it couldn't be helped. I have to earn a living. Had we made an effort to assess the ability to work on the trailer before just assuming it was accessible and could be worked on, it would have helped, but worst case was Mom can't go camping by July like she wanted to...
At least, that's what I thought at the time. Now I have to do it in the middle of Summer, during the hottest months of the year here in Florida, and get it done before I start work in July. Well, turns out that is nothing but a pipe dream...
Let's Start Assessing...
My first look at assessing the condition of the trailer, I see I still can't get anywhere near the trailer. It's just as grown up around it as it was last time I tried to get to it, maybe even worse. Before I can even get into it, I'll have to clear a path to the door, and that's going to take some time and muscle since there's no way even a gas powered "weed whacker" is cutting through it. I have a hand weed cutter, as it's called, that has a long, sharp, flat, serrated blade and a wooden handle long enough to swing it back and forth through the brush.
(4 July 2012)
So after a full day of swinging that weed cutter by hand, I can finally get to
the door and walk around the
front of the trailer. Now it's time to extend the two slide out sections.
One is the kitchen and the other the living area. I try the switches and...
Nothing. So I open the battery compartment in the front of the trailer to check
the battery condition... Dead. Good thing I brought one with me! I disconnect it
and connect my spare using jumper cables. Let's try that again... Still nothing!
About that time Dad says to hold on while he checks the battery disconnect on
the "wall" of the "basement" storage area behind the battery compartment. That's
it! And out they come...
First thing inside the trailer, it's hot! Real hot! So I open a couple of the windows, close the screen door, and latch the main door open. The retractable metal steps are rickity and have needed welded for as long as I can remember, so I brace them up with some bricks and a concrete block. There. Now we can get in and out without having to worry whether the steps will hold or not. After it's aired out a bit, I take a look around inside. Not quite what I had expected, to say the least... A little crowded, still a little stuffy, but it still looks practically brand new.
I have to move some things around to get to the slide out living area to assess the damage. At one end is a dinette, with a set of benches and a removable tabletop that can be stowed over the benches and made into a bed. At the other end is a corner cabinet that's hiding most of the damage to the floor. Unfortunately, it appears everything is installed on top of the carpeting, so everything has to go... Including the heat if we're going to be working in here.
First order of business is getting the air conditioning online. I find there are extensions cords, coiled up, and hanging in the overgrowth on the other side of the shed. They've been there since the last time anyone was inside. I think it takes both of them to reach from the house out to the trailer. At first, the air conditioning isn't responding, even though it's switched on. So I check the breakers and fuses at the main panel. Everything's good there, so I take the cover off the thermostat to expose the circuit board, looking for anything that looks wrong or out of place. Nothing out of the ordinary. After moving the switch back and forth a number of times, I finally hear the compressor kick on... briefly.
It's the switch itself. Where's my contact cleaner? That's right, back in Orlando! Oh well, wiggling the switch seems to get it to work, as long as I hold it to where it will stay on. Eventually it stays on by itself, just long enough to trip the ground fault outlet the extension cord's plugged in to. Change of plan. The extension cord gets plugged in to the outlet in the garage. The same one the freezer is plugged into. Well, that works for a while, but eventually it trips the breaker when the freezer kicks on. Change of plan. Since it's getting dark, I quickly change out the ground fault outlet with a standard duplex, with Dad holding the flashlight, and both of us getting eaten alive by mosquitoes...
That will work for now, that is, until I unplug it from the garage and realize how hot the cord still is and that it's beginning to melt... So I figure it's time to shorten up that extension to just one cord. That works until Dad unplugs it the next day when he mows the lawn. Well, it must have been overloading the extension cord because even with only one 50' cord, it melts open inside the plug. Shoot! Time to grab the other cord? Well, for now maybe since my wife, Ann, is here for the weekend, but tomorrow we need to go get one that can handle the 18A current draw of the air conditioner. The trailer itself has a 30A service, so long term, I'll need to put in a dedicated service for the trailer. We'll run another 30A service to the shed at the same time.
(Saturday, 7 July 2012)
Armed with a new 10# extension cord, and other supplies we need, we set out to
get this trailer ready to live in. While Ann cleans, I get busy with tearing
things apart. First out is the
corner cabinet entertainment center, which I thought needed totally
disassembled to remove it. But once I find the "hidden panels" on the sides, it
goes fairly quickly. I say "hidden panels" because they hide the screws that
hold it to the wall frames. I got to a point in taking it apart where there was
no way to get the shelf loose unless some screws were still hidden by those
panels. That was the clue I needed. With the cabinet out, the floor damage is
readily apparent...
I can see the ground outside, from inside.
Next out are the benches, one of which is really rotted on the bottom, where it appears water has been trapped in the carpet, soaking the wooden frame. As I remove the screws, it's obvious... One by one I find they have rusted away, just spinning in the bench frame. Can't wait to see what the floor looks like under here! But now with the benches out, they are getting in the way, so into the shed they go. The corner cabinet gets moved to the other corner of the trailer and we're ready to start taking up the carpet. As if the thousands of staples holding the carpet to the floor aren't enough, it appears the bolts that hold the floor to the slide out frame rails also hold the carpet to the floor... Time to knock off for the day.
(Sunday, 8 July 2012)
Some quick wrenching and the bolts are out... outside, on the ground, as they
fall through the floor once the nuts are removed. Now it's just dealing with
ripping out all the rest of those damned staples holding the carpet down. Well
now, isn't that swell? The carpet padding is sticking to the carpet where the
water sat and rotted the floor beneath the benches. And now with
the carpet out, even more damage is revealed. This just gets better and
better... Let's get that padding up and see what else is in store for us. Yep.
Wonderful. Looks like water has sat here for a long time... repeatedly drenched
and dried.
Worse yet, it looks like the water leak starts at the top of the wall, as well as leaking through the window frame, so now I have to remove the bulkheads from around the slideout to get at the wall panel and remove it to assess the damage beneath. It doesn't take long to see that even the "beauty trim" installed over the bulkheads has been constantly exposed to water. Those trim pieces are simply pressboard (medium density fiberboard, or MDF) covered with white vinyl, and smaller woodgrain print vinyl covered pieces, stapled into grooves in the white pieces to hide the screws holding them to the bulkhead. The bulkheads themselves are oriented strand board (OSB), wrapped with a sheet of metal flashing to provide a smooth surface to mate with the room seals when the slideout room is extended.
I also remove the window treatments and blinds, screwed into the wall panels. The inner window trim comes off after removing the screws that hold it to the outside frame and, surprisingly, the windows stay put? Turns out they are sealed to the outside using a butyl rubber based putty, that comes in a "tape" form, and resembles plumber's putty in color and consistency. The replacement "tape" comes in 30' and 50' double sided rolls, in varying widths and thicknesses. I learn all about it, and a whole bunch more, by reading the iRV2 forums. There are various groups for different manufacturers and types of RVs, one of which is for National RV. I soon learn that National RV filed for bankruptcy, which explains why I'm not finding much information, let alone the company site.
The deconstruction doesn't go as smoothly or quickly as planned. The wall panels are thin luan plywood, glued AND stapled to the wall frames, which are then vinyl covered. This makes removal difficult, to say the least. If not for the water damage and rot, the panels wouldn't have come off at all. What does come off, comes off in pieces, as the laminated layers separate and tear. The progress is slow and the day is short, so this will have to wait until next weekend, this being the removal of the slideout section... Why remove the slideout? It is finally apparent that the entire slideout frame is sitting ON TOP OF the floor that needs replaced... A floor made from one monolithic sheet of oriented strand board, 10' long, or at least what's left of one.
Ever try to find a chunk of plywood 10' long? Good luck with that! I search the RV forums looking for a supplier. I search for local lumberyards, even call them... No such luck. After all my rsearch, I am unable to find a local supplier for a sheet of plywood, even special order, large enough to replace the floor in one monolithic sheet. I now realize I'll have to glue separate sheets of plywood together to come up with something that will fit. But first we need to get the slideout room frame off the floor. I'll save that for next weekend.
(Tuesday, 10 July 2012)
During the week, I decide to get more done on the deconstruction. The plan is
for my son, Nick, to come over this coming weekend and help finish the slideout
removal. The aluminum siding needs to come off to allow access to the bottom
plate of the long rear wall. But first there are three pieces of aluminum angle
extrusion that need to come off before I can remove the siding. These extrusions
provide a flat sealing surface against the outside seals when the slideout room
is fully retracted for travel or storage. They are screwed into the corners of
the frame and seal the edges of the siding using more of that butyl putty. The
piece along the top also seals to the rubber roof sheet using butyl caulking.
Considering that the screws have been exposed to the weather for years, not to mention the moisture trapped in the wooden frame, it's not hard to guess how rusted and corroded they are. Some of them put up a fight, but I finally manage to remove all three of the extrusions, which frees up the top course of siding. At first, I try using a standard siding separator tool to try to release the top course from the next one down, after pulling out even more of those damned staples. I fight with it long enough to realize this isn't like any aluminum siding I've worked with before. I give up in frustration. Looking at the ends where the courses come together, I see that the bottom of the top course is also stapled down, and the top of the next course down slides into the bottom of it?
So... Looks like I'm starting with the bottom course on the fenderskirt and working my way up. The trim piece around the wheel well needs to come off first, and these screws are in really bad shape. I end up practically ripping the thing loose just trying to pull out the difficult ones! It's getting dark as I get the first few courses of siding loose, and I see even more damage! Hard to believe how much damage there is to the wall frame and the fenderskirt. Looking at the worst part of the wall frame, about a foot and a half up from the floor, it's still damp. I poke it with a screwdriver to see how soft and rotten it is and water starts trickling out and down the stud. Another poke a bit higher up and the same thing only worse - more like a standpipe than a stud.
(Wednesday, 11 July 2012)
The next evening, after work, I get the rest of the siding removed. It's a slow,
tedious process. Each course of siding is stapled to each stud, and not just
once, but twice, sometimes three times in places. I don't have a tack remover so
I have to get the tip of a screwdriver beneath each and every staple, pry it
loose, then grab it with a pair of pliers. As I said, slow, tedious work. But it
eventually pays off, all the siding is removed. All that remains is the
insulation and some staples that just tore through the siding, still stuck in
the studs, but that will have to wait until tomorrow.
(Thursday, 12 July 2012)
With the siding removed last night, I concentrate on removing and bagging the
fiberglass insulation on the outside wall. Then I move on to what remains of the
interior side panels, and once I remove them, the insulation behind.
The rear side wall is mostly rotted, with only a
part near the top outside corner that is still good. The other wall is in
pretty good shape, but also shows some
rot along the bottom and inside edge. The long back wall is attached to the
side walls and roof such that the wall panels are captive... that is, they are
"sandwiched" between the frames on both sides and can't be removed until it's
all taken apart. So that's about all I can get done for now, but the weekend
will soon be here.
(Friday, 13 July 2012)
I almost hate to work on this thing with it being Friday the 13th and
all, but it has to be done. Nick is coming over to help get this slideout off
the floor and on the ground where I can work on it and replacing the floor.
Easier said than done, but I concentrate on getting the rest of the interior
paneling off and removing and bagging up the rest of the insulation and debris
from the destruction. The key thing is to be ready to remove it without anything
in the way, inside or out.
(Saturday, 14 July 2012)
Nick is here and we start removing all the screws holding this thing together.
Some are on inside, through the bottom of the wall frame, some are outside, some
are underneath. On the outside, it was like the builders couldn't decide whether
to go in from the top or the bottom, so they did both. Most of the ones where
the water sat are rusted through and just spin. While he finishes taking out the
screws, I concentrate on disconnecting the wiring and cabling coming up through
the floor, through nice big holes drilled in the lower long wall frame.
Eventually we get it all loose from the floor.
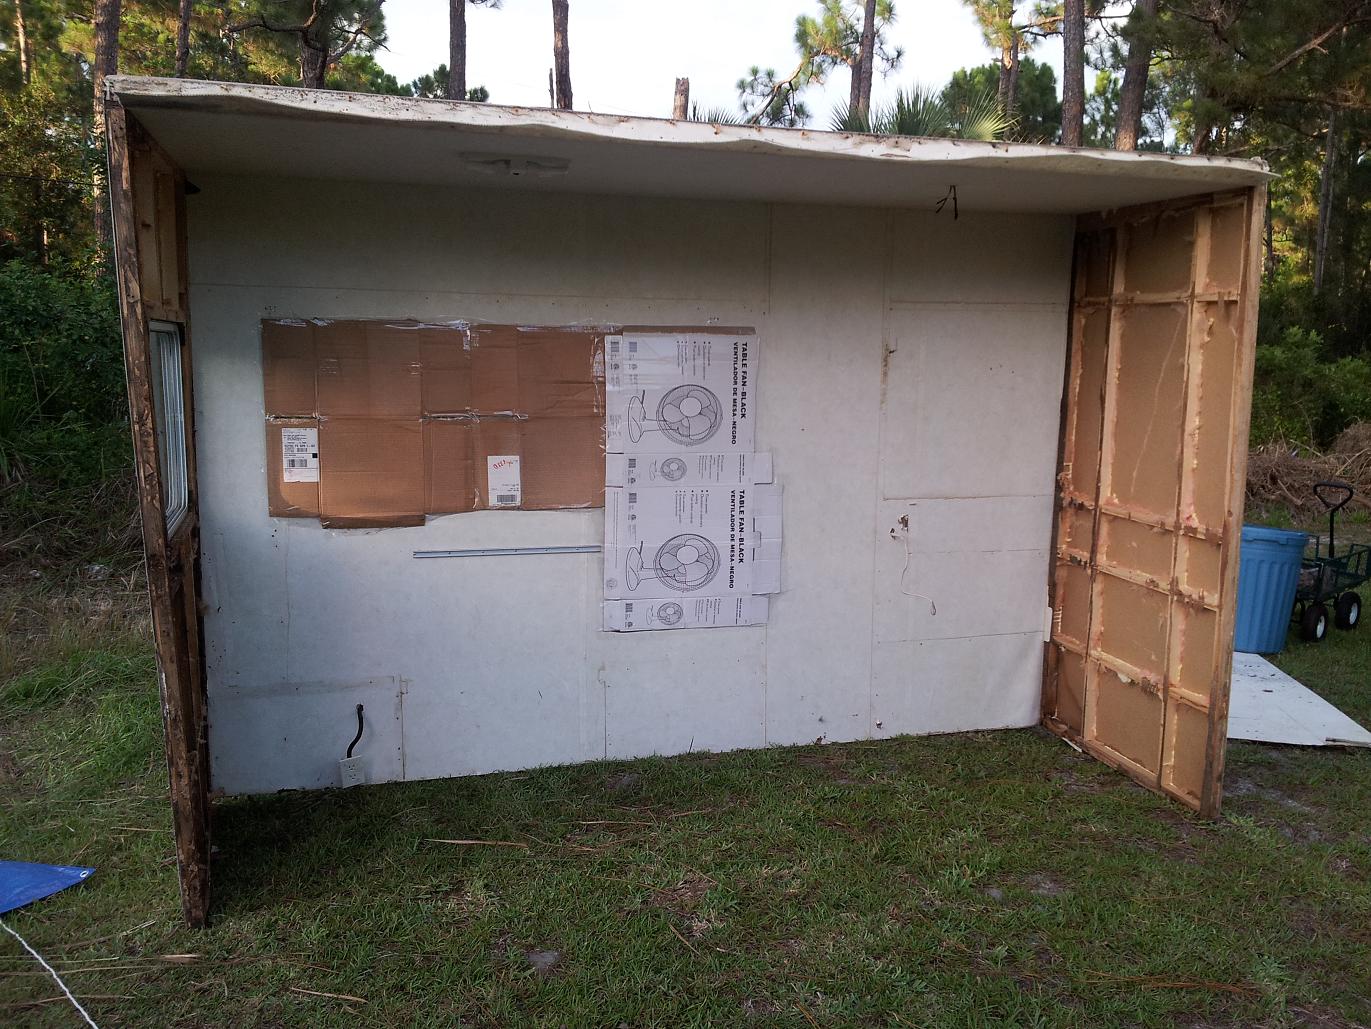
Next I back my pickup truck over to the side of the trailer, right up next to it, and we move the slideout off the floor and onto the bed of the truck. From there, it's a short trip to the side yard, and off the bed it goes... right onto the ground. There. That much is done. What's left of the rotted floor comes off and onto the ground next to the trailer, where it will sit until I figure out how to replace it. Now all that's left is to put up some tarps over the huge, gaping hole to try keep the weather and the bugs out. For now, that's good enough.
So there it sits. It looks like a bus stop out in the middle of nowhere. And it's flimsy now that it doesn't have the floor to brace it along the bottom. The wind is picking up and I'm worried it will be blown over, so I lay it down to where the long back wall is now facing up, exposed to the sun to (hopefully) dry it out some. Well, that's not happening. The weather forecast is calling for rain and even more wind, so I pick up a new tarp and cover it, weighting it down with some large decorative granite rocks to keep it from blowing away.
As much as I want to get to work on repairing the "bus stop", the weather isn't cooperating and it's a good thing we put up those tarps... The "bus stop" looks like Noah's ark now, sitting in the middle of the yard, surrounded by water. Sheesh! The water doesn't subside by the weekend, so I decide to take the weekend off and head home to Orlando and a much deserved break.
(Saturday, 28 July 2012)
After a nice break, we're back to it.
Ann and Nick have come over for the
weekend to help put together a new floor for the trailer... well at least Nick.
Ann does some weeding and sprucing up around the front of the house and the
trailer while
Nick, Dad, and I contact cement a new floor together from 4x8
sheets of plywood. The weather holds out until just after we put the pieces
together, then an all out cloud burst. We're all "trapped" under the instant
shade tents we put up to stop the sun from beating down on us just half an hour
earlier.
Unfortunately, the instant shade canopy isn't designed to stop rain water, so we are constantly pushing up on the large "bubbles" of water slowly accumulating all around the edges. I try my best to use the quick clamps to draw the canopy taught enough to keep most of the water running off. Eventually it slows down enough we're able to head into the house and have some lunch, thinking the rain is going to stop. Wrong. While we eat, it really starts to pour. After nearly an hour of rain, I begin to wonder how well the instant shade tents are weathering the storm.
I'm not happy with the scene we're greeted with when we head back out. The weight of the water trapped in the canopy has collapsed the new one and it's totally bent and deformed. We bought it to replace the first one when it was damaged by a sudden gust of wind. The damage appeared to be limited to the one leg, bent and fatigued cracked, but still strong enough to support it. It's sagging pretty good too, but still in good shape. After dumping the water out and setting them back up, it's obvious the new one is extensively damaged. All but one of the legs are bent, and the accordian style bracing around the top is bent and damaged along two of the four sides.
We check on the exposed contact cement, which is also wet, and decide to let the sun dry everything up before we do anything else with the floor. By now it's late in the afternoon, so we move on to tearing down what's left of the rotted floor, cleaning and priming the metal shoe along the edge that supports the inner portion of the floor when the slideout is deployed. It also has a set of three plastic support shoes beneath it that ride up and over the interior floor carpet when the slideout is moved in to the stowed position.
Nick and I take turns cursing them as the screws give us a hard time, either spinning with chunks of rotted wood still attached, or spinning in the rusted metal shoe. With them finally off and a wire wheel chucked into the drill, we clean off the surface rust, then hit it with some rustoleum primer. With that complete, we're ready to reward ourselves with a Bizarro Pizza for supper. What's that? Only one pizza you say? Well, once you see how big this puppy is, you'll have the answer! The box covers the entire top of the stove! It feeds all six of us with two pieces left over!
(Sunday, 29 July 2012)
Well, it looks like the rain took its toll on more than just the instant shade
tents. The short 2'x4' piece of the floor we cemented together yesterday is
bowed and loose and comes right off without much encouragement. The large 4'x6'
overlap of the two 4'x8' sheets of plywood comes apart with little more effort,
so it's obvious the contact cement doesn't have the strength to hold the floor
together. It was worth a shot, but it's back to the drawing board as far as the
floor design goes. Nick helps me clean up and store the plywood back in the
garage and heads for home.
I spend the next few weeks online looking for the secret and settle on some sort of epoxy. Most of the information I can find is on marine epoxy, but it's mainly for use in laminated boat construction, consisting of many thin layers... not two thick pieces of plywood. I finally settle on a two part epoxy paste, called PC-7. It's meant for applications where a thinner standard two-part epoxy is too thin, like the underside of a horizontal surface, plus its shear strength is better than standard epoxy. It comes in pints, quarts, and gallons. Sounds like the stuff I need. The only problem is I can't find any information on the application area it covers, so I don't know how much of it to buy.
(Friday, 3 August 2012)
The "bus stop", as we all like to call it now, will have to wait for us to get
back from our trip to Ohio. We fly out this afternoon, but that's a different
story...
(Wednesday, 8 August 2012)
We're back from our whirlwind tour of Ohio, and I'm even more determined to get
back to work on the trailer. I start by assessing the damage to the "bus stop",
taking some measurements, and drafting up some drawings before taking it apart.
I mark the areas of damage and formulate a plan of attack. I pick up a bunch of
2x2s, assorted screws, and other things we'll need to begin the process of
rebuilding the rotted portions of the frame. Nick isn't coming over this weekend
to help, so I start by removing the two short sides, allowing access to the
trapped paneling along the inside of the long back wall.
I figure I'll start with it since it is convenient to get to by myself without anyone's help. I try to remove as many of the rotted long back wall parts and the cut and place new pieces before he gets here. Well, it's a start anyway... I get as much done as I can without needing the 10' long 2x2 for the bottom plate. I buy a 10' 2x4 and a 14' 1x4, mainly because they didn't have a 10' or 12' one, thinking we can rip them to size (2x2 and 1x2). So we get Dad's table saw out of the shed and set it up, only to discover he can't find the rip fence attachment. Back to square one. I repair as much of the long back wall as I can, but without the 2x2 for the bottom, I really can't finish it.
(Friday, 10 August 2012)
Well, Nick has been wrestling with problems on the 750, so I head home this
weekend to help him sort them out. He's really more interested in getting the
1100 running, which needs the carbs rebuilt yet again, the replacement exhaust
chamber installed (after a good polishing), and a new fuel line. Oh, and that
front wheel that doesn't seem to want to hold air more than a few hours. I spend
a few hours both Saturday and Sunday trying to clean the rust off the exhaust
headers and polish them, but they still show signs of rust and pock marking, so
the old exhaust, rusted out on the right rear header, stays on. We swap out the
frint wheels between the 750 and 1100 since the 750 holds air. We order a carb
rebuild kit so he can finish the restore...
(Monday, 13 August 2012)
Over the course of the week, I manage to get done what I can, but it isn't much.
I turn my attention to the short front side wall, which only needs the bottom
plate and back stud that mates to the long back wall replaced. The rear side
wall needs totally rebuilt, so that will have to wait too. I have to leave the
short end walls wedged in place under the long back wall, to support it, in
addition to the many sawhorses it sits on. That means I really can't do anything
with the side walls until I get the long back wall together so that it can
support itself. More help is on the way for this weekend, and with no progress
on ripping the 2x4, I decide it's time to find a lumberyard that has one.
(Friday, 17 August 2012)
While I'm researching lumberyards, I call around to see if they have not only
the 2x2, but also a 4'x10' or 4'x12' sheet of 3/4" plywood for the floor. No
dice. Not even special order... So I have to wonder where these manufacturers
manage to find it to begin with? Oh well, no matter, at least I can get the
pieces I need to finish up the slideout frame repair. I stop by the lumberyard
on my way home from work and pick up a couple 10' 2x2s and the 12' 1x2 I need
for the roof. I get two of the 2x2s because I decided to replace both the top
and bottom plates of the long back wall frame.
(Saturday, 18 August 2012)
Help has arrived, and we get started on the long back wall. I remove what
remains of the old bottom plate and screw the new one in place. I move on to
removing the old top plate, but have to peel back the rubber roof sheet enough
to get to the screws holding it in place. All that remains is to snake the 12v
wiring out of the hole it passes through, drilled in the old top plate, and it's
free. I have to remove the patched in pieces I put in earlier along the corners
of the top plate, but with them out of the way, I screw the new top plate in
place.
I plan on replacing the old luan interior panels with masonite, but the old adhesive that held them in place needs to come off first. Trying to use Dad's old and flimsy putty knives isn't doing the trick, so Ann heads off to pick up some new, beefier ones and a heat gun. When she returns, she shows me the new heavy duty scraper she picked up, and off to remove the old adhesive she goes. It's hard work, and she hangs in there as long as she can, but eventually burns her leg with the heat gun and she can do no more.
While she's doing that, I work on rebuilding the rear side wall from scratch, using the old one as a template as I go. It takes most of the afternoon to finish it, but with that finally done, I move on to gluing the new masonite panels in place along the inside of the long back wall. Well, after a mandatory break that is... We have to move the back wall over to the driveway first, in an attempt to keep it as flat as possible while I place the panels. Ann helps me move it, but as we lift, she yells in pain! I forgot about the concrete block sitting between it and the sawhorse, which falls and lands on her foot, badly scraping her leg on the way down.
I'm beside myself, angry, worried my wife just broke her foot, and feeling stupid for forgetting about it to begin with. After the initial pain wears off, she's okay, but sits down for a bit to recover. She still has all her toes, and nothing is broken, but we both take things a bit slower now. Eventually we get the wall frame over to the driveway and I start gluing up the panels, nailing around the edges where it won't show, and weighting it down where it will. While I'm busy with that, Ann heads off to the store to pick up a dressing for her leg.
When I finally have all the panels in place, I use the router with a flush cut guide bit to trim the overhang, and we stand the completed wall assembly in the garage to set up overnight. We're happy with the progress we made and knock off for the day. Good thing too... I don't think Ann could have survived another accident!
(Sunday, 19 August 2012)
Tomorrow is our 29th wedding anniversary and we plan on taking the day off to
enjoy some time to ourselves. Ann has even brought a bottle of wine from the
Lakeridge Winery, which is near where we live in Orlando, made from the native
muscadine grapes. When we were in St. Augustine back in June, we took a tour of
a winery there, including a wine tasting of 13 different wines - all made from
the muscadine grape. Ann really liked one of those we sampled, the Rosa, and you
guessed it, that's the bottle she brought.
We spend the morning cleaning up the rest of our mess and head out in search of a place to eat in Palm Bay. A little history is in order... We used to live here in Palm Bay, about twenty years ago that is, and so much has changed since then. We don't really know what is where, and when we moved to Orlando back in 1995, Palm Bay Road was mainly a rural scene. Not anymore. What used to be scrub pine and palmetto is now a large strip mall, a Ford and a Harley dealership, and a new school.
As we cruise the strip, we come across an Italian restaurant and decide that's where we'll eat. We have a nice sit down meal and enjoy each other's company. Once we're back to the "Little Grass Shack", as we call the trailer now, Ann is ready to head back home. There really isn't much more she can do, other than scrape more old adhesive off the wall frame, so we say our goodbyes and she's on her way. We never did open the wine... It's still sitting in the fridge in the trailer, waiting on us.
(Friday, 24 August 2012)
After the fiasco with the contact cement and collapsed portable shade tents, I
am even more determined to find a solution to the floor adhesive problem. With
yet another investigation turning up no new information on coverage of the PC-7
epoxy, I turn my efforts to finding a local source so I can go read the label as
a last resort. I call around to the different places and find only Ace Hardware
has any on hand. It's only a short drive, but turns out not to be worth the
effort. No coverage information on the label and all they have are a couple of
the small cans.
Not all is lost though. I can order online from Grainger, and the Orlando store has quarts and gallons in stock, so I order two pairs of the quart sized parts A and B and hope it will be enough to finish the job. As a bit of a side note, I also find they carry the "push to close, push to close" latches like the one that's broken on CD door of the built in CD player in the trailer, so I order a some of those too. The radio in the unit still works, as do the built in speakers in the ceiling, so I figure why not?
The order ships out Monday and arrives Tuesday. Still no luck with the label directions and coverage, but at least I get the CD door latch fixed. Small consolation though. I have to pick up some things at Home Depot on the way home from work Thursday to finish this thing already! Among them are a roller pan, some plastic liners, gloves, and plastic spreaders to mix and apply the epoxy. Time is running out. Once home, I set up snd drill some pilot holes for screws, used to secure the pieces while the epoxy cures.
I need to get this floor done before Saturday, and we're burning daylight. What a pain and what a mess! Yuck. Dad helps me with the messy process. I knew it would be messy, but even with the plastic spreaders, roller pan, liners, and gloves, it's worse than I expected. We glue the small 2'x4' pieces to the long 4'x8' sheets, and I'm glad I clamped and fit them together first. I run the screws into pre-drilled pilot holes, securing the two pieces together, then set the subassembly aside to cure and repeat the process on the other pieces.
After mixing and spreading the thick, gooey two part paste, I realize the flimsy plastic roller pan liners aren't going to hold up to the effort needed to mix the epoxy paste. We hold off securing the two subassemblies together until tomorrow. We're out of daylight and I just used the only metal roller pan I have to mix the second batch. I'll pick up another one and some more spreaders on the way home from work tomorrow, but I'm concerned it will be cutting it too close to allow the epoxy enough time to cure.
(Friday, 31 August 2012)
I make a quick stop at Home Depot on the way home and we're back to work. It
takes the rest of the first set of quarts and pretty much the rest of the second
set of quarts to secure the two large subassmeblies together. As Dad and I
spread the last of the goop, I realize we're running out too soon and decide to
spread it even more thinly than we did on the smaller end pieces. I have to
"yell" at Dad to stop using so much! That doesn't go over so well, but we manage
to cover all the exposed area and secure the assemblies into one solid floor.
I spend the rest of Friday evening getting ready for the whole fam damily to arrive for our Labor Day "Trailerthon". It's the big final push to get this trailer back together and get me moved in. I need to have everything setup and ready to go Saturday morning so everyone has something to do and a plan for what they'll be doing. I knew I needed to get the rest of adhesive scraped off the frame pieces we're putting back together, so I did that over the last week.
About all I have left to do is trim the masonite sheets to rough size for the inside and outside panels for the short side walls. I can't trim them to size until the frame is assembled - the outside panels overhang the end studs of the long back wall and the inside panel height depends on the roof / ceiling installation. The only other thing I needed to do was install the last long back wall panel, which was also accomplished last week. I decide to experiment with trimming and installing the foam insulation in the short front wall frame, which goes slowly.
(Saturday, 1 September 2012)
And so our Labor Day "Trailerthon" begins... Ann arrives, with Nick and Sam
close behind. The first thing we do is put up the instant shade. Court and Es
show up shortly after that. Next up is the floor. Es helps me
apply the adhesive
backed roofing membrane to the bottom of the floor while Nick and Sam begin to
cut and fit the foam insulation to the wall frames. Once the membrane is on, I
attach the metal shoe along the inside edge of the floor using new screws. Last
on are the plastic sliders along the bottom edge of the metal shoe.
With the new floor assembly completed, Es and I carry it over to the trailer and set it loosely in place... after taking down the tarps covering the gaping hole in the side of the trailer that is. Next is marking the holes for the bolts that hold the floor to the slide out mechanism. I drill the holes and let Es install the bolts and snug the nuts down. He runs into a problem with tightening the old and rusted hardware, so I send he and Courtney in search of replacements.
Meahwhile, Nick and Sam are making good progress on the insulation, but the fit isn't as clean and tight as I'd like, and I let the perfectionist in me get upset with them about it. Big mistake. Ann informs me I hurt Sam's feelings. Once I think about it, I realize it's no big deal, and I can seal the edges with caulking if need be. I apologize to Sam and let her know her help is much appreciated. It's coming together nicely and not even lunchtime yet!
Progress continues on the getting the "bus stop" back together. As the wall frames continue to be fitted with insulation, I cut the remaining pieces of masonite to rough size. Nick and I clamp the wall frames together to get an idea of initial fit, then drill pilot holes and screw the pieces together. Almost a "bus stop"... All that remains is to attach the roof / ceiling piece and it will be ready to put in place on the new floor. ut that will have to wait. By now, it's getting late and time for supper.
Speaking of supper, it's time for some more Bizarro pizza... If you thought the first pie was big, consider two of them along with wings and breadsticks. What a feast! Good thing too. Everyone is hot and tired and hungry. It takes up most of the leftover 4'x4' sheet of plywood we've been using as a table top. Everyone grabs a plate and takes a seat to eat. Our feast is quickly consumed with only a couple pieces of pizza leftover. Court and Es head off to the hotel for the evening while Nick and I fit the roof panel to the rest of the wall framing.
(Sunday, 2 September 2012)
We start bight and early Sunday morning. Looks like I measured wrong because the
top plate of the long back wall extends a bit taller than the line of the roof.
Bummer... We'll need to cut. One by one, I remove the screws holding the top
plate to each wall stud, and cut off the extra a section at a time,
Nick replacing
the screws behind me as I go. This takes most of the morning, so Court and Es
are getting bored, but soon enough we're loading the new "bus stop" on the bed
of my truck and transporting it back to the trailer.
The process involves backing the truck up to the "bus stop", still sitting on the driveway, then lifting the front onto the tailgate. With that in place, a couple of people hop up in the bed to help guide it, while the rest of us hoist the back end up and slide it on as far as it will go. Nick stays in the bed to hold it stable while I pull up, then back it into place by the trailer. It's still quite flimsy, but we slide the back end out of the bed and onto the new floor. All that's left is to slide it into position and secure it to the floor.
Nick and Es clamp it in place a section at a time. The long back wall appears to have bowed while laying horizontally on the sawhorses for so long, even with the new top and bottom plates, so I force it into shape as best I can from the inside while Nick and Es clamp it and secure it on the outside. Eventually it's nice and tight and totally secured to the floor with screws from beneath, mainly because I didn't want any "hidden" screws in the walls to have to deal with, just in case I run into problems later.
Finally! our Labor Day "Trailerthon" is successful! The slideout is finally back together, at least a major part of it anyway. It's a good thing too, since it's already mid afternoon. There's nothing more Court and Es can do, so they say their goodbyes and head back to Orlando. Nick and Sam stick around so Nick can help me with soldering the 12v connections back together, once I bore the hole for the electrical connection through the floor and bottom plate that is.
Nick is hot, tired, and cranky by now and not having a good time of it. For some reason, the tip of my solder station is drawing an arc everytime he touches it to the 12v connections? Not good. This shouldn't be happening unless the ground is floating between the battery charger and the AC connections. Time to turn off power to the trailer and run the extension cord for the soldering station over to the house. Now that he can solder, he finishes quickly, and he and Sam are on their way home to Orlando too. Ann stays behind to help me to finish up what I can.
I begin by installing the 12v lighting fixtures. With that done, I can turn the power back on to the trailer. Good thing too, it's getting hot in here, and I need to turn the air conditioning is back on. Next I install the short inside end wall panels. I start with the front wall, applying the panel adhesive, then nailing around the outside edges and where it won't show behind the corner cabinet shelving. The coverage is good enough that I don't brace the panel while the adhesive sets up.
Next I turn my attention to the rear wall. I don't have the benefit of shelves to hide the nails, but I can nail around the window frame, where the trim piece will cover them. I thought I had cut the interior wall panels to the correct size such that trimming would not be necessary, but that's not the case for this rear wall. Oh well, I must not have shoved it back far enough. Next up is to install the bulkheads that mate with the main wall seals to help keep the heat and insects out. It's been dark for awhile now, so with that much done, we knock off for the night.
(Monday, 3 September 2012 - Labor Day)
We're off work today (obviously) and get an early start. The goal is to have the
exterior wall panels in place today. I start by moving the corner cabinet back
into place loosely, just to make some room to move around. It's still very
cluttered in here with all the old trim pieces, wall cabinet, and tools in the
way. Next I remove the bulkhead covering the rear wall so I use the router to
trim it to size, but I can't quite get all the way to the floor with it, which
requires some hand carving with the razor knife.
Ann vacuums up the sawdust and bits and pieces from the operation and I replace the bulkhead, now flush and tight with the wallframe. Before I can attach the outside panel, I need to cut out the window opening in the inside panel since it will be much more difficult to do with the exterior panel in place. With that accomplished, another another vacuum sweep, we turn our attention to trimming and fitting the new carpet padding.
First I have to take the corner cabinet back out of the way. Rolling out the padding is easy enough, but without a good pair of scissors it takes forever to cuxt it xto size, and trying to use a razor knife just wants to bunch up the padding and tear it. Eventually it's done and we can roll out the new carpet which appears to be just a bit too small. Try as I may, without a carpet stretcher, it has gaps around the edges. Even worse, the corner cabinet is too tight a fit to get back in place without trimming it down. Oh well, back to the panels.
Outside, I clamp the exterior panel in place. Then back on the inside, I drill pilot holes through from the inside, marking the outline of the window frame on the outside panel as a guide for nailing it up. Back on the outside, I mark the nailing locations, then apply the adhesive, clamp it, and nail it in place. One down, one to go. It's too late to start the other exterior panel, so we call it a day, and Ann's off to Orlando. I spend the rest of the evening cleaning up what I can.
(Wednesday, 5 September 2012)
I get home from work too late Tuesday to even think about getting the last wall
panel in place. Wednesday is a different story though. I clamp the panel in
place, but realize I'll need to somehow brace it, since there is no way to nail
the panel anywhere but the outside edges. I decide to use some of the leftover
scrap 2x2s strategically screwed in place, above and below the wall to allow
clamping some 2x4s against the wall panel, then
shim between them.
Armed with a plan, I take the 2x4s and panel back down, apply the adhesive and clamp the panel in place. Next I nail along the outside edges, but am unable to get to the edge closest to the main trailer wall. I try to wedge some of the scrap wood in the gap, but it won't stay in place. I'll have to go inside, remove the bulkhead, and clamp it from there. But that will have to wait until I finish clamping the 2x4s in place and shim the wall panel tight against the frame.
With that done, I head inside to remove the bulkhead. I use every last quick clamp I have along the edge of the frame to hold the panel in place until the adhesive sets up, but at least it's done. Good thing too, it already dark, and the mosquitoes are eating me alive! I just leave everything where it sits and call it a night. Before work the next morning I cover the slideout with a tarp since the weather report calls for showers and the rubber roofing still needs glued back down... that, and the siding is still missing from the long wall.
I remove the clamps first then quickly install the bulkhead. Once the tarp is up I'm off to work. Once home, I look to finish the rough in of the exterior electrical wiring, not so much wiring along the outside, but more of carving out the foam insulation to allow nesting of the wiring within. Once this is done, I can install the roofing membrane over the insulation and the long back wall in preparation for siding installation. I also trim the excess panel on each short side wall flush with the corners.
(Saturday, 8 September 2012)
Last night I started to
trim the insulation to fit better within the studs in
preparation for the roofing membrane. It takes longer than I thought it would,
but once I'm done, I enlist Dad's help the cut the membrane to fit, both height
and width, such that the edges align on a stud. With this done, I begin to
hang the first piece, stapling it in place along the top to temporarily hold
it, then peel the backing off the self-stick surface. The adhesion isn't as good
as I thought it should be, so I need to staple it in place along each stud as
well.
The next piece goes up and I need to stop to trim out around the window opening before hanging the last piece, which also needs trimmed around the window opening. Since the self stick isn't sticking very well, I have to follow up with the stapler to gold everything in place. That's okay though, once the siding is back up, it will hold it in place nicely. And that's the next thing to do, at least, get enough siding on to gauge where the top course should go.
As I said before, this siding goes together differently than any other I've ever used. Normally, I'd start at the bottom course, then work my way up, engaging the bottom tab of the upper course with the slot at the top of the lower course. Not here. Top course first, then slide the tab at the top of the lower course into the slot at the bottom of the upper course. Because of this, I have to make sure to place the top course correctly, so that those that follow will correctly align with the window opening... and (eventually) the bottom of the fender skirt.
Dad helps me get the top course stapled in place, after many false starts, and much cursing. Thankfully, it only two courses from the top to get to the window opening and we eventually get the top installed in the right place, but the staples keep pulling out so I grab some of the panelling nails and nail it in place. I'm almost out of panelling nails and don't have any longer staples. Fortunately, a quick trip to the hardware store remedies that situation. Unfortunately, the longer staples just bend and deform, so nails it is. That's it for the day though.
(Sunday, 9 September 2012)
Getting an early start, the order of the day is the siding and the windows, and
I finish up what siding I can. It's slow going, even with Dad's help, but the
siding is as done as I can get it... as done as I can get it with the fender
skirt still missing that is. The fender skirt is pretty much rotted apart and
the only thing still holding it together is the woven weather resistant wrapper.
While solid pieces of the OSB still remain, the entire piece needs replaced, and
again I have the issue of where to find a solid 10' long piece of plywood. But
that's another problem for another day.
Last Thursday, as Dad was mowing the lawn, he unplugged the extension cord that supplies power to the trailer. That's fine, I'd rather not have him chop up the $95 cord with the mower blades, but he forgot to plug it back in. When I got home from work that evening and wondered why the trailer was sweltering inside, I realized the power was off, and suddenly the refrigerator full of food was my main concern. Thankfully it had only been a few hours, but I knew I had to do something about it, both to keep from from happening again, and spare Dad from having to worry about unplugging it in the first place.
With time to spare before dark and a 10' length of black drainage pipe, I get to work with the shovel and start a trench across the narrow strip of lawn between the house and the trailer. I neatly cut out the sod, place the pieces in an orderly fashion so I can put them back where they came from when I'm done, and place the dirt in the wheelbarrow. Sounds a lot like extra work, but let's just say it "bothers" me when I see a yard project where dirt is just piled on the grass. Besides, I don't want Dad to worry about running over piles of dirt with the mower either.
I get about halfway across when I run into the supply lines for the irrigation system Dad installed awhile back. I had been taking an angle, but now I decide to follow the line that veers off straight across, in an attempt to avoid hitting it and breaking it or the other lines. Eventually I have a trench about a foot or so deep, place the drain pipe in it, and start to back fill it. After carefully replacing the sod, I stamp the pieces back into place, and can hardly tell where I've dug. All that remains is to pull the extension cord and the water hose through it and connect them up. Time to hit the showers.
(Tuesday, 11 September 2012)
That other day has arrived, the day to make a new fender skirt. When I get home
from work, I set up the sawhorses by the trailer, place
what's left of the old
fender skirt on them, and get after the
rusted angle iron with a wire wheel in
the drill. I just barely finish removing the rust on the exposed side as it's
getting dark, but still manage to get
a coat of rustoleum gray primer on it
before I'm out of paint and I knock off for the evening.
(Wednesday, 12 September 2012)
I stop at Home Depot on the way home and pick up a couple a spray cans of black
rustoleum and another of gray primer. I need to take the angle off the fender
skirt to get the back side. That angle iron connects the fender skirt to the
slideout, but offers little strength, and is actually quite flimsy where the OEM
cutout the sections that fit over the slideout mechanism arms. I clamp it the
sawhorses so I can keep both hands free to guide the wire wheel and get to it.
With that done, I turn to the other angle iron that holds the bottom seal, where the fender skirt mates to the frame beneath the slideout. The seal itself clips on one edge of the angle, but the seal is old and brittle and cracked. I pull it off the angle and get after the rust with the wire wheel. I flip it over and get the other side just in time to run out of daylight. Again I barely manage to get a coat of rustoleum gray primer on both before I knock off for the evening.
(Thursday, 13 September 2012)
Ready to finish painting the angle iron, I put a couple of good coats of the
black on both when I get home from work. While I wait for those to dry, I look
at what it's going to take to rebuild the fender skirt. Upon closer inspection,
after removing the woven wrapper and fighting the fire ant colony that's made a
home in the rotted wood, I find that the OEM just
stapled 8' and 2' long pieces
together! Well, if they can do it... Instead of staples I'll use another piece
of plywood as a patch panel though.
Using what's left of the old, rotted piece, I trace the outline and the fender well cutout location. I refine the tracing using the aluminum fender well molding as a template. After some quick work with the circular saw, I grab the scroll saw and cut out the fender well opening. All that's left is connecting the two pieces together with the patch panel, then covering the front side with some of the leftover roofing membrane, and finally wrapping the back of the assembly with the old, but still useful woven weather cover.
I put that off for another day, and turn my attention back to the angle iron, painting the other sides with the black. That's about all I have time for before it's dark. Ann is coming over this weekend to help get the finishing touches on the trailer and get me moved in! At least, that's the plan, and I'm pretty much on track with what needs done for that to happen. All that remains is to cut down the corner cabinet so it will fit over top of the new carpet, so I move inside the trailer and get started on that.
First thing I have to do it get the top frame pieces out of the way, mainly by removing the umpteen staples on both sides of it, holding it on both ends to both side frame members. With those out of the way, there are a couple screws that hold the front edge molding in place the need to be removed before I can cut it. That, and repeat for the other side of the cabinet. By the time I'm done with both sides of the cabinet, it's getting late, so I'll have to cut them to size tomorrow night after work.
(Saturday, 15 September 2012)
Ann get's here bright and early. She has to call me to get me to come open the
door no one hears her knocking on. After we have some coffee and I'm done with
the morning routine, we get to work. Last night I finished cutting the corner
cabinet to size and put it in place, after a couple tries that is. It was still
a tight fit, but at least it's in place. I still need to cut the beauty panels
that fit along outside of both sides to fit though... some other time.
We start by cutting out the window opening on the long back wall with the router and the flush cut guide bit. Next I test fit the window, after removing the old butyl "tape" that is. After applying a new stripe of butyl tape around the back of the outside window frame, I place it in the opening and have Ann hold it there while I go inside and start running in the screws that hold the inner frame to the outer, slowly drawing them tight to clamp the two pieces together in a clamshell fashion between the inside and outside walls.
After a couple of them fight me and refuse to thread, I break one off and realize I've installed the inside frame upside down. Oh well, now that I know what's going on, I use some self tapping screws to "drill" pilot holes for the remaining screws that don't easily thread. One down, one to go. With the router in hand, I begin to cut out the opening in the short rear wall from the outside, but hit the side of the trailer about a quarter inch shy of completely cutting it flush. Armed with a razor knife, I hand cut the excess away, but it takes time.
The window is a bit of a tight fit, but with some wrangling, it finally fits into place. Ann likes the fact that she doesn't have to hold it in place, but speaks too soon. The inside frame is more than a tight fit, more like a press fit, and as I'm struggling with it I manage to knock the window out of place. Thinking the worst, I go outside to check on the window that just fell to the ground, from about six feet up. Thankfully there is no damage, but now how do I get that inner frame to fit into the opening that is obviously too small?
I don't want to cut the wall frame, especially with the hidden screws and those nailed in plastic corner pieces in the way. I keep after it, getting three of four sides in, with one continually popping out as the other goes in place. It's frustrating and I'm cursing it, but with the help of a mallet and some careful cutting with the razor knife, I finally manage to coerce it into place. I take a trip outside to put the outside frame back in place. Back inside, I'm able to get the screws in with minimal effort. I draw them tight and we're done!
Well... not really done done, but we're close. Ann helps me install the overhead cabinet that fits against the long back wall of the slideout over the windows. While I had the siding off and was trimming the insulation to fit in preparation for the roofing membrane, I noticed I had forgotten to put in the pieces of 2x4 to give me something to screw the cabinet into from the inside. Originally, the entire bottom of the cabinet was screwed from the outside, behind the insulation and under the siding. Nothing but the thin luan panel to hold it, and it couldn't even be removed until that much was out of the way first.
Now I'm glad I took the extra time to do it because all we have to do is hold the cabinet up to the wall and screw it in. I run a couple screws in on the end and along the front into the ceiling to hold it in place, then drill some pilot holes along the bottom rail against the wall and run the rest of the screws in. All that remains is placing the two bottom liner pieces in place over the frame and the beauty panel that covers the end by the corner cabinet. With that done, it's time to get rid of the rest of the clutter and clean up.
Ann wants to spend the night in the trailer, so we start moving my things into the trailer. We gather everything together and out to the trailer it goes! Computer, monitor / TV, battery backup, projects, magazines, clothes, etc. Last out is the recliner that's always been in the way in the bedroom in the house. At first I resisted putting it in the trailer, instead wanting to put the dinette back in place, but Ann has convinced me otherwise. Before I go to all that trouble, I measure it first, and then the door to the trailer. Let's just say it fits.
We've worked up quite a sweat, and it's time for a break, and a beer! I sit in the recliner and kick my feet up while Ann takes a perch on the couch, but not before connecting up the cable! Now we can sit and watch the game and have a beer and relax. Tamiko, Mom and Dad's foster boy, is happy to finally have his room back! And I'm happy to finally have the trailer back together and livable and be moved in! It only took three months, much longer than the three days I thought it would take, but a can of worms is like that...
(Sunday, 16 September 2012)
After a spending a night on the matress, Ann wakes up with some hip pain, and
decides it's too firm (for her). I'm just glad I didn't sink into it like our
tempurpedic back home. We put the coffee on and sit down to wait for it to
finish. We discuss what's left to do to, both inside and out. Outside I still
need to glue the rubber roofing back down and install the aluminum extrusions
that provide a flat mating surface for the outside wall seals when the slidout
is in the stowed position. They also protect and cover the edges of the siding
and short side walls.
The water's been connected for a couple weeks now. We've been able to use the kitchen sink and the bathroom for awhile now. The only problem I ran into was the outside shower fixture, and that problem surfaced right away. As I opened up the hot water valve, it kept turning and turning. When I tried to close it, it broke right off and I had a shower alright! Water was spraying everywhere! After running to shut off the water, I found some threaded fittings that fit the pex connections in the garage, but nothing to cap them off with. Dad picked up what we needed and put it back together enough so at least the water could stay on.
I haven't been able to check out any of the propane gas appliances yet since the gas bottles are empty. The furnace, the stove, and the hot water heater all run on propane. Even the refrigerator can run on propane - it's the adsorption type! To this day my brother still gets a kick out of Dad saying that. Long story, but the short version is: Dad used to work on heating, air conditioning, and refrigeration. He would tell us about how the early refrigeration units used the adsorption (no, not absorption) type chillers. Being an engineer, I was interested in hearing how it worked. But after a while, Matt would just laugh at hearing "adsorption type"...
Well, guess what kind of refrigerator the trailer uses? That right, the adsorption type, which is why it can work using electricity or propane gas. It basically boils an ammonia solution like a percolator, rather than compressing a refrigerant like freon, to obtain a pressurized gas. If you've ever used a spray can, you've probably noticed how it tends to get colder and colder the longer you release the gas that's compressed inside, like the propellant in hair spray or spray paint.
It's a basic principle of physics, as a compressed gas is allowed to expand, its temperature drops. All refrigeration is based on that, Boyle's Law, but that's enough physics for one day. Google it if you're interested. If not, I'll understand. So where was I? Oh, yeah, the refrigerator... Anyway, it only takes about 300 watts or so to power it, versus that monster in most kitchens that consumes many times that much power, rivalled only by your A/C unit, or your electric hot water tank or clothes dryer. The point is, it doesn't take much propane to generate 300 watts of heat.
We've been running it on electricity only, but it has an automatic setting that allows it to switch to gas if it loses electricity. That way you can "boondock" camp, which is basically camping somewhere without any water or electric hookup. It has a 50 gallon water tank which, if you're frugal, gives you about a week without having to fill up. I've yet to fill and sanitize it yet, but I do know the water pump comes on when I accidently hit the switch on the control panel over the stove. It's really kind of neat too...
There are also storage tanks for the toilet and the shower and sinks, one for the "black" water (toilet), and one for the "gray" water (sinks and shower). There's even a switch on the control panel that turns on a set of LED indicators that tell you all the different levels, black water, gray water, fresh water, and battery charge. About the only thing you need 110 volt electrical hookup for is the air conditioner, the microwave, and TV. That is, unless yours is battery powered too.
All the lighting runs on a 12 volt deep cycle (marine) battery, as does the refrigerator, the water pump, the furnace blower (and thermostat), and even the ventilation fans in the range hood and the bathroom. All the ignitors for the gas powered appliances do too, except for the stove, which has one of those "push to ignite" piezo clicker thingies like on your gas grill. Not sure about the oven pilot light, yet... There's even a solar panel on the roof that will charge the batteries when not connected to electricity (supposedly, I don't have a ladder tall enough to see it, but I digress).
Without propane, I really can't test the rest of the appliances I'll need to have working to call this place home, so we head to Ace to have both of the 30# bottles filled. They're bigger than the standard 20# bottle like on your gas grill, maybe not twice as big, but I wouldn't want to have to carry anything bigger than these when they're full! I lug them both back to the trailer, set them in place on their roll out tray, connect them up, open one and turn on the control valve to start using that bottle.
The control valve will automatically switch from the empty bottle to the full one, but I decide to only leave one open at a time, so I'll know when it needs filled. That way, I'll still have nearly a bottle in reserve until I can get the empty filled, rather than wait until both are empty and get caught with no heat on a cold night. Granted, it doesn't happen too often here in Florida, but it does happen. So... armed with a supply of propane, we head inside to check things out.
We start with the stove - I turn on the front burner and hear gas, so I push the ignitor button a couple times, see the sparks, and then flame. I turn it off and turn on the left rear, which fires right up, as does the right rear burner (that's right only three burners). Next I try the oven pilot light, but there doesn't appear to be any spark there, so I use a lighter. Once it stays lit, I set the oven to turn on, and shortly afterward hear it roar to life. Excellent! The stove is completely functional.
Next is the hot water tank. I decide to go outside and have a look at it before we flip the switch on the control panel. Everything looks okay, nothing like a nest in the burner tube or rat chewed wiring, maybe rusty in places you'd expect rust is all. I pull the low side wiring connector off of the ignitor control module to check for corrosion and all the connections look good, so I send Ann back inside to flip the switch, and hear a click, click, click from the auto ignitor, but it doesn't light.
I pull the connector off and reconnect it. I here the gas turn on and see that the ignitor is throwing a spark, but it still won't light. I disconnect / reconnect again and click, click, whoosh! I see and hear it roar to life. Nice! Guess I had to wait for the gas to get there and displace the air in the lines. That's the two most important appliances working anyway. If it weren't in the nineties I might even try the furnace too. That's going to have to wait until later. I may even try and see if the refrigerator works on gas someday too, but for now, at least it works on electric.
With that much working, I turn my attention to the rubber roofing and the corner extrusions. I get the contact cement out I need to glue down the rubber roofing. The rubber roofing that needed peeled back to gain access for removing and installing the screws that hold the roof panel to the slideout frame. It takes time to apply, it takes time for it to set up, and it takes time to carefully smooth it down. Once it's all in place, I'm able to install the extrusions, one by one, until they're all in place. That is, once the old butyl tape has been removed and replaced with new and a bead of butyl caulk laid down along the underside to seal it to the rubber roofing.
That leaves the aluminum angles that protect the edges of the roofing and help to seal it against the side panels at the top. I run a bead of butyl caulk along the underside of the angles a screw them down. First I had to figure out which of the four went where, but I realized in doing so that I will need to pull the screws back out of the plastic "bumpers" the slideout rides on underneath in order to install the bottom angles. That's alright for now though, any rain water will just drip off the bottom edge of the side panels... I hope.
That pretty much gets everything done and scratched off the list. Time to sit down, relax, and have a beer. I'm now officially moved in and have a roof that (hopefully) won't leak when it rains. I have a few odds and ends inside that still need done, like the window blinds and curtains, but the game is on the TV, the beer is cold, and the recliner is comfortable. Can't remember if this is the weekend Ann decides to stay another night and head back home early in the morning or not. Pretty sure it is.
(Monday, 17 September 2012)
If Ann didn't head back to Orlando yesterday, she certainly did early this
morning... and I'm starting a new routine of heading into the house to use the
facilites and the shower, then heading back out to the trailer to dress and
leave for work. I already have keys to the house and garage doors, but there's
only one set of keys for the trailer, so I'll need to have copies made. Not
today though. When I get "home" to the trailer, I decide to put the blinds up,
but first I have to change out of my work clothes into my work clothes. Hey!
Wait a minute...
What I mean is change out of the business casual clothes I wore to work today and change into some old clothes I can work around the trailer in and not care if they get ruined. There's a small closet as you walk up into the bedroom, and two more even smaller closets on either side at the head of the bed, but not much will fit in those but shirts. Thankfully, even though the closet is small, it is tall and my dress pants can hang in there so they don't get too wrinkled.
It's nice to be able to come home to a place of my own, so to speak. It's still Mom and Dad's trailer, but it's my home away from home, "The Little Grass Shack" as Ann calls it. It takes some getting used to, but I still won't have much privacy until I get those blinds hung back up over the windows we just put back in. I begin by measuring how long the the blinds are, then mark where the end bracket go... Wait a minute, where did those brackets go? I put all those pieces for the blinds and curtains together, but where did I put them? Are they still here in the pantry? Yes, thankfully they are.
Once I have the brackets, the battery drill helps make quick work of screwing them to the wall, and up the blinds go. Not bad, now let's hang up the curtains. Wait a minute, where did I put that other set of curtains? I have the set for the window in the long back wall, but cannot find the set for the short rear wall anywhere! I'll bet they're still back in Orlando... I left them there so if the carpet guy couldn't match the old powder blue carpet, maybe he could pick up the gray color in the curtains, so at least it would look like the carpet in the slideout being a different color from the carpet on the main floor was supposed to be like that, coordinated with the rest of the decor. Nope. It's beige... (sigh)
Oh well, I should be used to it by now. It's not that important anyway, not like the curtains can be drawn closed or anything, because they can't. These are more like windows treatments than curtains. The top part is gathered over an insert, with "tails" hanging down on either end that look like curtains gathered back in a holder. The insert screws into a set of right angle brackets that screw into the wall on either side at the top of the window, and the "tails" have a one piece insert / bracket that screws into either side at the bottom of the window, I assume to hold them in place while in transit.
By the time I'm done searching for the other window treatment and realize it's nowhere to be found for a reason, I just put the two screws in the middle of the one I do have that hold it to the bottom of the overhead cabinet and calls it quits. There, the blinds and window treatment are done! It's good enough for now and I'll finish it up once I have the other one. I don't want part of my new routine to be staying up too late, so I watch a bit of TV and head to bed.
Over the course of the week living in the trailer, I learn its limitations, one by one. The kitchen sink faucet has a crack just above where the aerator threads on and sends a small stream of water shooting toward me every time I turn it on. I take the aerator off and figure out a way to get an o-ring type washer to fit over the crack, then use a thicker washer so it will still seal to the rest of the faucet AND the o-ring over the crack. It still leaks a little, running down the spout to the back of the sink, but at least it's not shooting me like a squirt gun anymore.
And while it does have storage tanks, they are filling up quickly, and I can't just empty them on the ground. So even though I have water, I can't really use much until I figure out how to empty the tanks. In talking with Dad previously about how to empty the tanks, he told me he had to put in a new clean out by the septic tank, when Mom hit the sewer line to it with the rototiller a while back. I'm not looking forward to having the fill the "honey pot", a portable storage tank, and wheeling it over to the clean out everytime time they need emptied though...
After spending quite a bit more research time online, I find there is a device called a macerator pump that grinds up the contents of the storage tanks and pumps them out through a large garden hose. It's like a small garbage disposal, but it runs on 12 volts. Some folks have even made there own from actual kitchen garbage disposals, but they use regular house current. For a minute, I actually consider making one myself, but decide to just order one specifically designed for the job. Now I just need to find who has one for the best price.
(Tuesday, 18 September 2012)
The only other limitation, and it's not necessarily a limitation of the trailer,
is the lack of Internet connectivity. Nick recently upgraded our house in
Orlando to use gigabit ethernet, so I brought one of the spare routers back with
me, with the idea I would set it up in the garage as a repeater bridge between
Dad's network and the trailer. Well, the results are less than spectacular, and
Dad's network has problems to begin with, but at least I can surf the web from
the trailer.
(Friday, 21 September 2012)
Nick is coming over to help me with the fender skirt this weekend, plus we're
going to the Cocoa Beach Air Show on Sunday, so I have to get that fender skirt
ready to install tonight. With Dad's help, I'm able to completely wrap the front
and back of it with the leftover roofing membrane. Getting the two pieces to
stay together, one 8' long and the other 2' long, is a feat in and of itself.
Next is stapling the old woven wrap in place along the backside. It takes a lot
of staples, but I finally get it into shape around the fender well cut out.
Next is attaching the angle iron that mounts to the bottom of the slideout floor. Rather than using the old, rusted screws to attach the angle iron, I get out the box of new ones that we used along the edge of the new floor to attach the metal shoe. I align the top edge of the freshly painted, and now sun baked, angle iron with the top edge of the fender skirt and screw it down. Now it's ready to install and I'll finally be able to finish that siding.
(Saturday, 22 September 2012)
Ann comes over with Nick and gets started on my laundry while Nick, Dad, and I
get started on attaching the fender skirt. First I have to trim the overlapping
roofing membrane from covering the long back wall of the slideout. My idea was
to fold it under, wrapping it around the edge of the new floor, sticking it to
the bottom of the floor and overlapping the piece we put on it before. It does
not want to stick to itself, unfortunately, but I figure it can be held in place
by the angle iron.
I think part of the problem is I didn't cut the overlap to fit around the mounts for the slideout mechanism so that it would fold over and fit flush against the bottom of the floor. Well now's my chance. A few quick cuts with the razor knife and that much is done. Next up is mounting the rebuilt fender skirt. Thankfully Nick climbs underneath to screw it in while Dad and I hold it in position. Now it's time to see about fitting those last pieces of siding, and... oh, wonderful, the fender skirt is too tall by about a quarter of an inch!
Guess I should have taken into account the roofing membrane is about an eighth inch thick, times two thicknesses, top and bottom. By now it's already after lunch, and even if we take it back off to trim it, I'm going to have to remove the wrap from the top edge, and then peel back the roofing membrane just to cut it. And that will take time, time I don't want to take right now, so we just leave it as is. Nick and I shower up so that we and Ann can go to Chili's for some lunch. They want me to try the new pretzel thingies they had the other day and loved.
Ann is thinking it would be nice to have a little block patio in front of the trailer, under the pull out awning, which Nick and I have finally managed to deploy. And she's not the only one. When I was using the wire wheel to remove the rust from that angle iron, the more I walked around them sitting on the saw horses, the more wet "muck" I churned up beneath my feet. So once we're back, I decide to fill in and level some of the low spots around the trailer.
I grab a shovel and the wheelbarrow and start digging up the big pile of dirt behind the trailer, long overgrown with weeds. I figure there's plenty of dirt to fill in the low spots with, and it can't hurt to try to reduce the size of that dirt pile either. I get a couple loads in place take a break. It's nice to sit down in the shade beneath the awning and rest a bit. I do four more loads, between the fire ant attacks from stirring up their mound, and that's about all I can handle for today. At least the patio area is filled out and ready for some patio blocks. Time for another shower I'm thinking...
(Sunday, 23 September 2012)
Well, today is the big day. Nick and I are going to the Cocoa Beach Air Show.
And VIP seating no less! But we have plenty of time before it starts, so there's
time to figure out which of the control valves feed the irrigation zone by the
trailer. At first I though about running a dedicated water line, but after
yesterday's experience with the shovel, I rethink using the irrigation lines
that are already in place. To do that, I need to figure out which water line by
the garage feeds it.
I ask Dad how to manually switch on the valves from the timer and he tells me I just have to turn the control valves themselves to turn them on. I can't get them to turn easily, and considering how many things I've destroyed by overpowering them with my "meathooks", I ask Dad to demonstrate. He walks right up and twists one on... Figures I'd find the one that was stuck. Only three of the four zones turn on for some reason though. Guess which zone doesn't turn on? That's right, the one for the trailer.
Oh well, that can wait for now. Nick and I head out for the air show and have a great time, even though the B1 bomber is grounded and the F16s were called to active duty. We get some free T-shirts, and the VIP seating entitles us to free food (and free beer for me). Just having a spot to sit out of the sun is the best part, other than the show itself. Being on the beach, they were able to demonstrate quite a few rescue techniques, both Coast Guard and Navy Rescue.
The VIP seating also entitles us to prime parking, so getting out of there is quick and easy. We'll have to do this for all the air shows we go to from now on! Once we're back to the Grass Shack, Ann and Nick pack up and head for home. That leaves me with some time on my hands, so I decide to mess with the valves again. This time I figure out why the zone by the trailer isn't turning on... the valve itself is stuck and the entire valve is unscrewing from the manifold.
Using a wrench, I'm able to get the valve open and sure enough, it's the one I'm looking for. Good! I'm a step closer to having a dedicated water supply to the trailer. And when I get that macerator pump, I'll have the spare hose to reach that clean out too. Now I just have to find the water line where it runs under the trailer so I can tap in to it. Not tonight. It's been a busy weekend, and I'm ready to head in for the evening and relax. I'm still getting used to this new routine.
(Monday, 24 September 2012)
We get some sprinkles overnight and it's pretty foggy out this morning. I put
the coffee on, switch on the hot water heater, and start my morning routine. I
put on the news, have some coffee and a smoke, then head into the house for my
shower. I come back out to the trailer and start to shave, but there's no hot
water... great, just when I thought it was safe to trust the water heater, it
stops working! I cold shave and finish getting dressed for work, then head out
to investigate.
At first I think it's just the excessive condensation on the electronics. First I unplug the connector and try drying it off then spraying it with some contact cleaner and reconnecting it. The gas comes on, but no spark. I try lighting the gas with a lighter, and it burns for a short time, then turns off. I try it again. Same thing. Looks like the automatic ignitor has failed. I head off to work and put that on my list of things to research.
When I get home from work, I decide to try to mess with the ignitor some more and see if it was just the excessive humidity this morning. Nope. After removing the ignitor module, inspecting the electrode and buzzing it out, and cleaning the high voltage contacts, it still doesn't work. Oh well, I tried. I head to Ace to pick up some of the things I need. I pick up the patio blocks and the brown panel nails I need to finish installing the corner cabinet. I also have them make duplicate keys for the trailer, but they can't find a blank for one of them. At least it's not the key for the door.
I unload the patio blocks, a wheelbarrow load at a time, and wheel them over to the trailer. I also picked up some bags of sand to help level them, but don't take the time to do that now. I'm sick of all the dirt and mud I'm tracking into the trailer, not to mention the fire ants that must have been living in that dirt I spread around, because they're everywhere, so I just put the patio blocks in place for now. It takes me until dusk to finish, and I know I'll have to revisit it, but it's as done as it's going to get. I turn on the patio light, take some pictures to send to Ann, then head in for the night.
After spending quite a bit more research time online, I find a replacement for the hot water tank ignitor and order it along with the macerator pump and a new vent fan for the bathroom. It was comical when I first tried to turn on that bathroom ventilation fan... The fan blades all shot off in different directions and shattered. I knew then I wanted to replace it with a Heng Vortex fan, but hadn't decided where I was going to buy it yet. Even though I could have saved a few dollars ordering it elsewhere, this ignitor incident made up my mind. I can get it, and everything else I need, from AdventureRV. I place the order and wait for it to ship.
(Tuesday, 25 September 2012)
While I'm waiting, it's easy enough to just shave in the house after my shower
before returning to the trailer, and hopefully I won't have to wait long since
the order shipped today. Also while I'm waiting, I decide to find that water
line when I get home from work. I line up between the sprinkler heads and start
digging, but even with a visual indication on both ends of the pipe, I can't
seem to find it. But my perserverence pays off and eventually I do.
I finish the trench to the back corner of the trailer, where the utilities connect. I'll sink a 4x4 post for the a spigot there. I have some tough going when I get to where those damned decorative granite rocks were piled and sank into the ground, but once I'm past that, it goes quickly. It's getting dark as I finish, so I measure out how much schedule 40 pipe I'll need, and put together a list of materials to pick up on the way home from work tomorrow.
(Wednesday, 26 September 2012)
I stop at Home Depot to pick up my list of things, but by the time I get home
with them, it's too late to start working on the water line. I do get the 4x4
for the posts cut in half though. While I'm at it, I figure I'll put another
post and spigot by the corner of the shed, just for the convenience of it. Maybe
someday I'll get to that dedicated power feed to the shed and the trailer too,
but not today.
(Thursday, 27 September 2012)
When I get home from work, I get started on the plumbing right away. First thing
I do is clean and
cement the two ten foot lengths of pipe together with a join.
Then I cut the line at the trailer, clean it and an elbow, and cement the elbow
to it. Next I clean and
cement the 20' length of pipe to the elbow. I place the
4x4 post in the trench to gauge how tall to cut the pipe that will come up to
the spigot, measure, and cut it to length. I clean it and another elbow, then
cement them together.
To finish it off, I clean the standpipe and threaded elbow for the spigot and cement them together, then place the post and back fill the trench to hold it in place. All that's left is mount the pipe clamps on the post to hold the standpipe in place and thread on the spigot. Then it's time to connect the supply end by the garage. First I cut off the old end from the existing tee and shutoff valve. Then I measure and cut a length of pipe to get me over to the control valve, clean it and a coupling, and cement them together.
Next is cutting the existing line from the control valve, cleaning it and an elbow and cementing them together, and the same on the other end of the new supply line. All that remains is to cut a length of pipe to fit between the elbows, clean them, and cement them together. While I'm waiting for the cement to set, I head back over to the trailer end and thread on the new brass spigot using some teflon tape. I head inside the trailer to grab the battery drill and some screws to mount the new pipe clamps and finish it off.
I head back over to the garage for the moment of truth... the leak check. I turn on the supply valve and check for leaks on that end. Not finding any, other than around the packing nut, I head back over to the trailer. Nothing leaking in the trench. Nothing leaking at the spigot and the post isn't floating. I connect a hose to the spigot and turn it on to flush out the line. I grab the battery drill, screws, and plumbing stuff to put away. As I head around the other side of the trailer, I think I feel it starting to sprinkle... then I realize I'm under the awning.
It's sprinkling alright, but it's the sprinkler head I thought was clogged. I head back to the garage to turn off the supply and then head back to investigate the mysteriously unclogged and working sprinkler. Looks like these misting heads have a threaded connection to a reducer with a plastic tubing connector on the other end. I wonder... Yep. The other spigot I bought for the post by the shed threads right on it, with some teflon tape of course. I make sure to close the spigot and thread the sprinkler connector on the other side.
I head back over to the garage to turn the water back on and let the line continue to flush. I head into the house to wash up and tell Dad I got the water connected and working and he tells me the shipment has arrived! While I'm excited about it, that quickly dies as I realize they sent me the wrong fan! Instead of the Heng Vortex, they sent me the same fan that's already in the trailer, the cheap one with the exploding blades! So now I'm happy that I can fix the hot water heater, and empty the storage tanks, but not so much with the fan.
Oh well, I grab the new ignitor and the new water supply hose and head back out to the trailer to install them. With the new parts in place, I head inside the trailer to turn on the water heater, which fires right up, and run some water from the new dedicated supply. Good! That much is done. I only wish I could be installing that new fan. I head back in the house to grab a shower and check out the new macerator pump. There's no time to play with that tonight, but I have a look at it and read the sparse instructions later.
Looks like I'll have to get some crimp rings for the bare ends of the supply wire they included... For now I can just put them between the existing rings and battery posts and tighten down the wing nuts. Some other time. I head out to fill in the trench. I want to leave it open overnight, so I can check for leaks in the pipes before burying them, but I would have seen any by now. I backfill the trench that my feet somehow keep falling into. But even with it backfilled, the dirt has somehow turned into a quagmire of muck.
I put the long one by whatever board, that Dad's had laying around outside forever, on top to give me a solid surface to stand on without having to worry about the instant quicksand I just created. But my feet and legs are now covered with dirt and muck, so I decide to try the shower in the trailer to wash them off and test out the water heater and new supply. It's small and cramped, but at least it works, and now I know I can use it in a pinch if I have to. And now that I'll finally be able to empty the storage tanks I don't have to be so frugal with the water usage... or so I think.
(Friday, 28 September 2012)
I take some pictures of the new water supply... and the wrong fan, just in case
I need them to explain the mixup to AdventureRV customer support, and head off
to work. I call them only to find out I need to submit an online claim. Well,
that's as much fun as I've had in a while... NOT! Once I'm finally registered
with them, I can file a claim, or trouble ticket, or whatever they call it. I
explain what's happened and attach a picture of
what I ordered,
what they sent,
and ask that they please send the correct one. I check my email periodically
the rest of the day, but hear nothing back from them before I leave for Orlando.
Well, once I'm home to Orlando, I check my email again. The response I get from AdventureRV is short, and pretty much what I expected. Here's a return label for you to print and attach the the box to ship the wrong one back to us first, then we'll ship you the correct one, we promise. They even said they were sorry this happened, but it's small consolation for the trouble, considering they still have my money and I don't have what I ordered. I need to box it up and print out the label and get it all ready to go, but it will have to wait since I'm in Orlando and it's in Palm Bay.
My concern for this weekend, other than getting a haircut, is getting the taxes done, or in this case started. I usually file for an extension, then wait until the last minute, but this year I haven't even bought a copy of TurboTax yet! All the paperwork, W2s, receipts, etc., are still sitting in the box I left them in. I haven't even sorted the receipts or statements and such and put them in chronological order yet! But at least that much gets done and I can take them back with me to do in the evenings after work.
(Monday, 1 October 2012)
I head to work from Orlando this morning, getting a late start even though I get
moving an hour earlier than usual. I'd forgotten how stressful that drive can
be, except it used to be the other direction, until we moved to Orlando that is.
I get settled in at work and let Ann know I made it okay. I'm a little nervous
about leaving all my things in the truck all day while I'm inside, but all is
well when I leave for the day.
Once I'm back to the Grass Shack and unloaded, I head in the house to talk to Dad and print out that return label for the fan and get it all boxed up. I head back to the trailer to order TurboTax, download and instll it, and get started entering the basics. I'm up late doing it, but at least the W2s and all the 1040 stuff for earnings is entered. I ball park what I can for deductions based on the previous year to get an idea of where we're at.
(Tuesday, 2 October 2012)
I'm getting a late start this morning, so I decide to take my shower in the
trailer. After I'm done shaving and brushing my teeth, I find out that I should
have been more frugal, as water starts rising up into the bottom of the shower,
the low spot in the system. Looks like I'll have to test out that new macerator
pump sooner than I thought, but it will have to wait until I'm home from work
tonight. For now, I head in to work.
When I get home, I grab the new macerator pump I left sitting in Dad's room. First I have to wire it up, starting with the remote hand held switch, but they only supplied one of the two wire nuts I need, and I forgot to bring any back with me. It's always such a joy when looking for something and Dad says, "It's somewhere..." Yep, good luck finding somewhere! I can't even find a roll of electrical tape! But I can't let that stop me, the tank is over full already, and been that way all day. I don't want to find out there are leaks that high in the plumbing the hard way.
Next I need to figure out how to the connect the other end to the battery and the two position trailer connector on the pump when the wires are couple feet too short. I don't have time for this! Jumper cables from the truck bridge the gap, albeit in an overkill fashion, but at least I can turn on the pump. Now to figure out how to connect the pump to the plumbing and how to get the hose into the clean out. Well, the clean out part is simple enough with Dad's big @$$ pipe wrench, but unfortunately, the hose end at the trailer is the wrong gender.
Dad has one of those female to female connectors somewhere... So, time to pull the hose out of the buried passthru and put it back in the opposite direction. I route the hose so it's not a tripping hazard at the trailer and connect the other hose to it, just past the passthru, and route it directly to the clean out and hope it isn't a tripping hazard in Mom's overgrown garden. I place the end of the hose into the opening in the top of the clean out and head back to the trailer to test it out.
I remove the cap covering the storage tank outlet, place the o-ring in the mouth of the macerator pump, and twist lock it into place on the outlet. So far, so good. Next I thread the hose onto the outlet of the pump, open the gate valve to the black tank, and turn on the pump. Sounds like it's working! I head back over to the clean out to check for output at the other end of the hose and there is! Nice! Now as long as the hose and the pump don't clog, we have a winner. I wait for the pump sound to change as the tank empties and it does.
Time to open the gate valve to the gray water tank. The folks on the RV forums recommend using the gray water to help flush out any remaining "solids" in the black water tank, so that's what I do. I turn the pump back on and it runs, and runs, and runs, seemingly forever. At least now I know about how long I'll have to wait for these tanks to drain. Some folks on the forums brag about emptying their tanks in half an hour or less, but I'm wondering how. They must not rinse and flush the tanks when they're empty.
I figure since these tanks have been sitting for who knows how long, with who knows what sitting in them, they should really be flushed with clean water and drained again. With the tanks finally empty, I close the gate valves, and disconnect the pump. It's quite warm, but not for long as I rinse it and the outlet connection with the water hose. Then I connect the water hose to the waste hose to flush whatever remains in it into the septic tank. While I wait, I place the cap on the outlet and twist lock it in place. I turn off the water and walk over to the clean out to remove the hose and replace the threaded cap. A few turns with the pipe wrench and I'm done.
I clean up myself and head to the store to pick up some lunches and other things I'll need to last the week. Once I'm back and the groceries are put away, it's back to doing taxes. Pretty much the rest of the week is going to be taxes. And the week after that too. The only distraction is Dad's birthday on Friday. That, and the problem I'm having with the repeater bridge maintaining a reliable connection to Dad's router. Nick's bringing a 100' cable over this weekend and crawling up in the attic to pull it from the cable modem over to the garage. Hopefully, this will allow a stable connection and better Internet connectivity.
(Friday, 5 October 2012 - Happy Birthday Dad!)
Needless to say, I don't get much else done on the trailer this week. Nick heads
over early and I get out of work early so we can get this ethernet cable pulled.
The pulling part goes smoothly, Nick is only up in the attic about fifteen
minutes, but it's the termination phase that goes awry... For whatever reason,
the cable that goes on the cable modem end gets stuck / jammed in the wall
around the other phone, cable, and electrical wiring.
Nick tries it, I try it, but try as we may, nothing is getting that cable end free! WTF?!? After wrangling with it for nearly an hour, we finally decide to cut the cable and crimp a new end on it. But that means a trip to the store to buy a crimping tool and the ends we'll need. Radio Shack should have it, so we call it a night and plan on picking up what we need tomorrow. We decide to head to Publix and pick up a birthday cake for Dad and have them write "Happy Birthday Grandpa" on it. Once home, we all enjoy a piece of cake, then Nick heads back in to set up Dad computer to run a virtual machine in XP.
Long story, but the short version is Dad had so much stuff installed on his hard drive, stuff that didn't have an uninstall, stuff that I thought might be part of the problem with the network. So I removed a bunch of stuff he wasn't using anymore, but that triggered a bunch of anti-virus warnings and toasted his PC. I felt bad, but he had another hard drive that he installed Windows 7 on. Now we just need to recover the data on his old hard drive. I say we, but Nick is the "IT guy" doing it. He gets the virtual machine (VM) installed, but it's so resource intensive, it slows Dad's PC to a crawl.
(Saturday, 6 October 2012)
The next morning we set out in search of CAT-5E... Well, Radio Shack is a
disappointment, as usual. Seems like anymore all you can get there is cell
phones and I can't find the electronic parts I'm looking for they always
used to carry... The ones that gave them their namesake. What a bunch
of crap! Thankfully, there's an Ace just down the strip (mall) from Radio Shack,
and they have what we're looking for and more! Not only do we find the crimping
tool and ends we need, but we also find CAT-5E wall plates, the "1141" 12 volt
bulbs for the trailer lighting, and a new kitchen sink faucet!
Armed with the supplies we need, we head back to the house to complete the job. This shouldn't take long at all... Yeah, right. Nick crimps an end on and it doesn't work! Now WTF?!? I take a closer look and the only thing I can see is maybe the insulation displacement piece isn't fully piercing the wire's insulation? I grab my new meter and buzz out the connections. Sure enough, some of them are reading open. Nick tries again, but this time different wires aren't making contact. This damned wire is nothing but trouble!
I give it a try and fold over the wire ends, doubling them up on themselves, then use the plastic "punch" tool to drive them home. That seems to do the trick on all but two of the wires. I rework them until they do make a positive connection. Finally! Next is routing the cable down the wall in the garage to an old phone plate that's no longer needed. Nick climbs back up in the attic and feeds it down, or so he thinks. I can't find it anywhere in the wall opening, and he's having a hard time getting around all the stuff in the attic to get a good line on it, but he finally threads it down through what looks like a piece of plastic conduit and that much is done.
All that's left is to pull enough of the extra cable through and route it along the ceiling of the garage over to the router on the opposite wall. We plug it in and the link light comes on. Nice! The router is now hard wired into the network and the job is finished except for installing the wall plate for the cable modem end. Dad says not to worry about it for now, so Nick is on his way home and I'm messing with reconfiguring the router for the Grass Shack.
Dad continues to have trouble with his PC and how slow it is, so after a number of phone calls to Nick, I realize Dad doesn't really need to run the XP VM. Nick set it up in case Dad needs to run some of his old XP programs, but all Dad really needs is to get to the data from the old hard drive, which is still intact. That makes Dad happy, and me and Nick too. Dad copies the data over, wipes the old drive, and is back up and running.
(Sunday, 7 October 2012)
This morning I decide it's time to replace that
leaking kitchen sink faucet with
the new one Nick and I picked up at Ace yesterday. It goes quickly, although I
do have some trouble reconnecting one of the pex supply lines. I go outside to
turn the water back on, get back inside just enough to realize I have a leak,
jump out and run back to shut it off. Dad sees me and asks if there's anything
wrong. Told him I think I cross threaded the supply. After reconnecting the
supply, all is fine, and I have a
new faucet with no leaks. Nice!
While I was outside, I realized I'm sick of looking at that mess of brambles, sawgrass, and overgrown weeds "infesting" the roll fencing that all needs removed. It's been in the way for far too long, so I decide today is the day to get it done. I grab Dad's weed whip since I took ours back to Orlando and left it for Ann to use. I grab an extension cord and get to work beating back the weeds and such. I'm making good progress until I manage to get the line tangled around that damned wire roll fencing and end up stripping out the plastic drive on the weed whip.
Great! I just ruined Dad's weed whip. Guess I'll be buying him a new one. That doesn't stop me from getting most of the fencing out of the way and using the hand snips to cut back the bramble. It's slow going, but a snip here and a tug on the vines there, and it's soon cleaned back past that pile of dirt. That's the next thing to go, but not today. I've been rolling up the fencing as I go, so once I eventually get to the end of it, we'll have a roll of fencing we can reuse elsewhere. Good enough for now, I head back into the trailer to cool off and relax.
So for me it's back to taxes and setting up the new network configuration. I'm still having problems with connectivity to the trailer, mainly due to the low signal strength. My laptop does okay, but the desktop can barely maintain a connection, if it can make one at all. The Roku does about the same as the laptop, but it's just not enough to watch Netflix, the only reason I use it. So the plan is to bring back another 100' ethernet cable next time I'm home, hardwire the trailer to the network, and use another spare router in the trailer itself.
(Friday, 12 October 2012)
I head home to Orlando from work, armed with my laptop and the box of tax stuff.
The taxes are almost done... just a few things I need to look for that aren't in
the box of goodies. I take the time I need to finish them and actually file them
early! This is probably the first and only time I haven't felt so stressed about
them though. After an enjoyable weekend with the family, I head back to work
Monday morning, taking the spare router with me.
(Monday, 15 October 2012)
Home from work at the Grass Shack, I start to work on reconfiguring the router.
It goes quickly and I'm soon connected to the network with my desktop computer.
Next I reconfigure the wireless settings on the laptop and the Roku. They're
working fine now too. Netflix works without a hiccup, and I get better speed
than in Orlando! That gets me thinking about looking into a replacement cable
modem at back home. At least it's not crawling like it would be with DSL. It's
ten times faster!
We bought an economy carpet kicker at Harbor Freight over the weekend, which I brought back with me so I can finally get that carpet tacked down, and finally mount the corner cabinet permanently and wire up those still dead outlets. I have to move everything out of the way, and I'm reminded of how cluttered this trailer used to be back when we were first putting it together. Even with the kicker, I'm having trouble stretching this carpet enough to fit edge to edge. I decide to get the end you can see along the short front wall tacked down, then whatever isn't covered along the short rear wall will eventually be covered by the dinette benches anyway.
I tack down the perimeter as I go, working up a sweat, but at last it's finally done. Next I move the corner cabinet into position and start running in the screws along each side until I'm happy with it. Then the shelves are secured and all that's left is to put the cover piece back on underneath, inside the area the TV sits in. I bend panel nail after panel nail until I finally get it secure enough to stay in place and look good doing it. Last is wiring up the outlet. By now it's well after dark, and turning the power off is really out of the question, so I work on it live.
The two piece outlets use an insulation displacement approach, which I've never seen used anywhere else. I pull the wires out enough to reach the outlet, punch in the connections, and try to snap on the back cover and it doen't fit? Turns out I ran the wires in the wrong end of the outlet. One end has a cut out for them, the other doesn't. Disgusted with myself, I pull the wires back out, and yet again punch them into place. This time the back cover snaps right on and I place the outlet into position in its cut out inside the corner cabinet. I tighten the screws that draw up the ears on opposite corner, like on a standard old work box.
There! Now I can finally get rid of that extension cord running across the floor that I keep tripping over. I put the battery backup back in the corner cabinet on the shelf beneath the TV opening, where the receiver will go eventually, and start routing the wires and cables. It's a mess and pretty cramped, but with the TV in place, I turn it on and make sure it still works. Not bad. Last thing is to install the last light fixture I've left off because it kept getting in the way everytime I had to move the corner cabinet. It's nice to have yet another thing completed and crossed off the list.
(Monday, 22 October 2012)
Lowe's?
(Saturday, 27 October 2012)
Halloween and brains cupcakes?
(Friday, 2 November 2012)
Finally got that refund from AdventureRV. What a bunch of clowns! I will NEVER
do business with them again. Not only do they send me the wrong item, more than
once, I have to figure out what their problem is for them. The attitude and (lack
of) customer support I got from their people was terrible, as if they couldn't care
less whether I do business with them or not! As if they don't get paid enough to
care. I can sense the low morale from here. Not even a coupon for $$$ off on my
next purchase, as if there's going to be a next one after this fiasco. I'll take
my business elsewhere. Too bad, so sad... FAIL!
(Saturday, 3 November 2012)
Over the last few weeks, I'm back and forth between Orlando and Palm Bay. Now
that Nick has the 1100 running, we're able to ride the motorcycles again. It's
nice to be able to take our family rides out to Mt. Dora, and enjoy some two
wheel therapy. I'm taking the 32" TV back to the Grass Shack with me this time.
I measured the opening in the corner cabinet and it will just fit. That way I
can move the 26" TV into the bedroom and set it up with the Roku for Netflix. I
have the computer in the living area for watching Netflix there. And both will
have the low band analog and digital channels available, the ones Bright House
gives you for free.
(Tuesday, 6 November 2012)
Well, the toilet in the trailer's been leaking water intermittently ever since I
moved in. I've been laying a towel on the floor to soak it up and keep it from
reaching the soft part of the floor in the bedroom. Now that I can empty the
storage tanks when needed, I've been using it every morning, heading into the
house just to use the shower. So the leak's become more frequent and more
noticable. From the reading I've been doing online, I find some models have an
air break to prevent backflow into the fresh water, some don't. Guess which one
I have?
Anyway, for those that have an air break, the fix is to replace the air bleed. For those that don't, the fix is to just replace the entire water valve. I'm assuming the air break's built into the valve or has something to do with the "float" portion of the valve. It's not a float like you'd think of on a standard toilet though... It's a piece of plastic with what looks like a washer on the top. Since I got my refund on the Vortex fan from AdventureRV, I decide to put together an order from Camping World and see how they rate.
(Wednesday, 7 November 2012)
I've been staying up too late watching TV in the living area, then heading to
bed, and having trouble falling asleep. I figure now I can set the sleep timer
on the TV in the bedroom and just drift off... Once I move the TV shelf in the
bedroom down the wall enough so there's room for it that is. It's set up for the
old style 9" portable TV's. I don't think even a 13" set would fit in the space
available. I've been staring at this 32" TV box all week. I'm going to fix that
in just a bit though.
When I brought back the 32" TV I also brought back Ann's old Kenwood receiver, the one she's had since before we were dating, at least 30 years old now. I'll need it to drive the Cerwin Vega speakers I brought back with me as well. I put the original battery backup on the bottom shelf of the side stand next to the recliner, plug it into the now live outlet that used to fit it in front of one of the dinette benches, now dangling from the opening in the wall, and plug in the router. With that all back up and running, I move on to getting the 32" TV installed.
I put the smaller battery backup I brought back with me in the corner cabinet on the shelf beneath the TV opening, where the receiver is going, and start routing the wires and cables. It's a mess and even more cramped now, and I have just enough speaker wire to place one on either side next to the recliner, but I get everything connected and ready for the big test. With the 32" TV connected and in place, I turn it on and have it learn the channels. While I'm waiting for that, I head to the bedroom and move the shelf, along with its collapsing brackets, down the wall.
I move it down the wall with just enough clearance for it to fit, mainly because the cable I have is just long enough to reach it from the cable outlet in the ceiling. I connect the Roku, its power supply, and the HDMI cable to the TV and put it all in place on the shelf. Then I turn it on to make sure it still works. Next I switch to the HDMI input and make sure the Roku works, which it does. Nice! Because the viewing angle is wrong, I have to tilt it so forward so I can see it correctly, but I won't be watching it all the time so it's good enough for now. I hear the 32" TV is now working, so I head back to the living area.
I turn on the receiver and set the controls so I can listen to the TV through the speakers. Man is that nice! No more "tinny" little TV speakers, but full bass and crisp highs. And now the last test, tune in the rock station and place the antenna for the best reception. I turn the dial to find WJRR and I'm rocking out! The whole trailer is booming to the bass! Guess I won't have to worry about installing the auxilliary and external speaker connectors on that built-in CD player like I thought...
With all that done, I plug in the computer and boot it up. It is now hard wired to the router and comes right up. Netflix is working, and with the receiver so configured, I'm able to hear it through the speakers now too. I sit down in the recliner, select some MP3s to play on the computer, kick back and rock out for the evening.
(Friday, 9 November 2012 - Happy Birthday Honey!)
Today is Ann's birthday and I'm heading home to Orlando straight from work. We
enjoy a pleasant weekend, and before I know it, it's over and I'm on my way back
to the Grass Shack. I'm really starting to dread that Monday morning commute. It
doesn't matter how hard I try, I can't seem to get out of here before 7:15, and
it's usually more like 7:30. The worst part of the trip is Maitland Blvd getting
to I-4, and then I-4 getting into downtown. I still manage to get to work around
9:00 AM, so at least they're not bitching about me getting there late.
(Monday, 12 November 2012)
Getting back to the trailer, the Camping World order arrived Friday after I left,
so tonight after work I'm messing with installing the new Vortex fan. I remove
the beauty trim from around the old fan, snipping the wires from the switch.
Then I remove what left of the blade hub to get at the two small screws that
hold the dinky motor to the existing frame and cover mechanism. It takes a few
tries, but I finally manage to figure out in which of the two positions the new
offset gear mechanism needs to go, and proceed to wire up the new switch and
motor.
I actually remembered the wire nuts this time, so I select the two that will best fit this application and connect it. Next I screw the new fan housing into position on the existing frame, taking advantage of two pre-existing holes. I attach the knob to the gear mechanism, crank open the vent, and turn it on. Yep, it has powerful suction alright! Until now I've had to rely on burning scented candles and opening the windows, when the weather permits, to cover the musty smell inside. Not anymore! Well, I still burn the candles, but it's nice to be able to just switch on the fan.
Well, after a few days with the new fan, I notice it's putting out a LOT of noise on the 12V electrical system. Next time I'm home I grab a choke I bought to eliminate alternator whine in a car's audio system I've had just sitting around for over thirty years waiting to be useful again. I wire in inline with the 12V power feed, but it doesn't really do much to eliminate the noise. Next time I'm home, I grab a couple capacitors to build a PI filter, but even that doesn't do anything. A little research online tells me it's because my filter isn't in the correct bandwidth.
That's all I'm doing for now, so I just put the beauty trim in place and wait for another time to find the correct filter parts. I haven't really done much with the trailer since I installed the fan. I still need to put in a dedicated power feed to it, and I want to get the fresh water tank cleaned and sanitized, just so I have a backup. That, and a little more water pressure when I need it, but that can wait for a bit longer. Thanksgiving comes and goes, and the time off is nice, but the paycheck's a bit lean. Contract means higher pay, but no work, no pay for the Holidays. After we decorate for Christmas in Orlando, Ann comes over to help me decorate the Grass Shack.
I already put up the rope lights on the outside along the awning, and now it's time to decorate the inside and my little potted tree we picked up at Walmart. I'm looking forward to some more time off, but not the lean paychecks. I adjust our budget to leave us a little more for Christmas, deferring paying things down to the New Year. As I'm talking to the bean counter at work about having to drive back just for three days between Christmas and New Year, he suggests I just get VPN installed on my work laptop and remote in for those days, and I'm surprised I'm hearing this from him. Deal!
I spend an enjoyable Christmas break with the family. I'm glad to have a break, and really enjoy working remote with the work laptop plugged into the big 60" plasma, instead of the "dinky" little laptop screen. I could get real used to this! The time goes quickly and before I know it, I'm on my way back to the Grass Shack. Everything is the way I left it, and all those things I want to get done still need done, but it's a new year and I know little by little they will get done.
Starting At The Beginning...
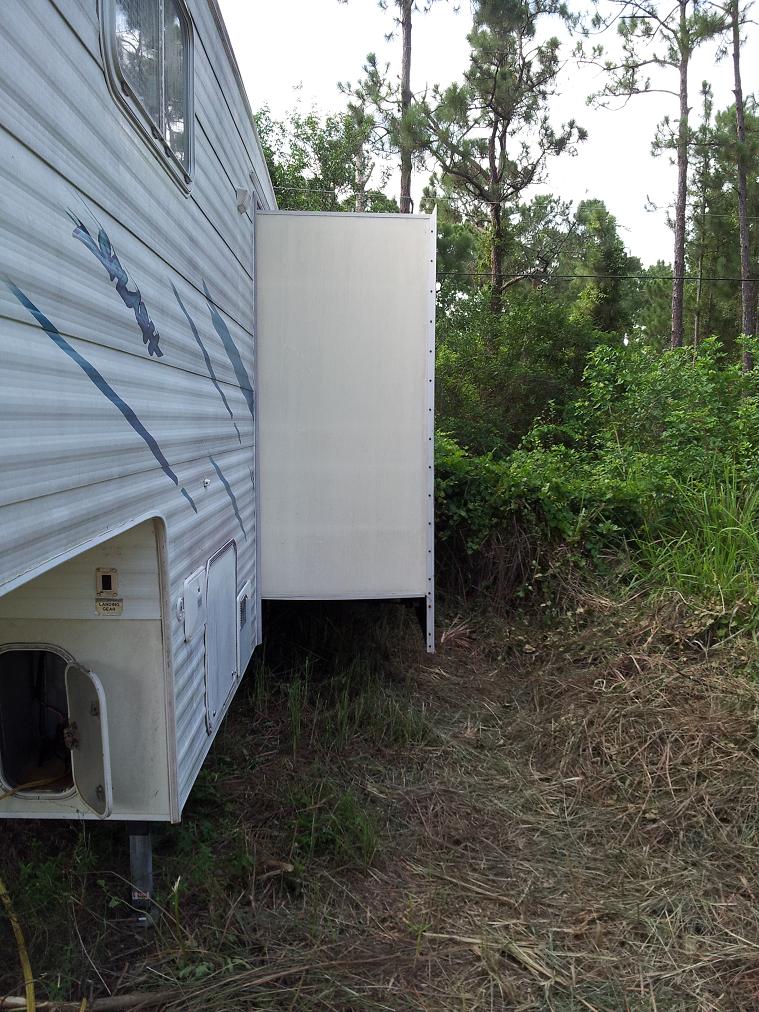


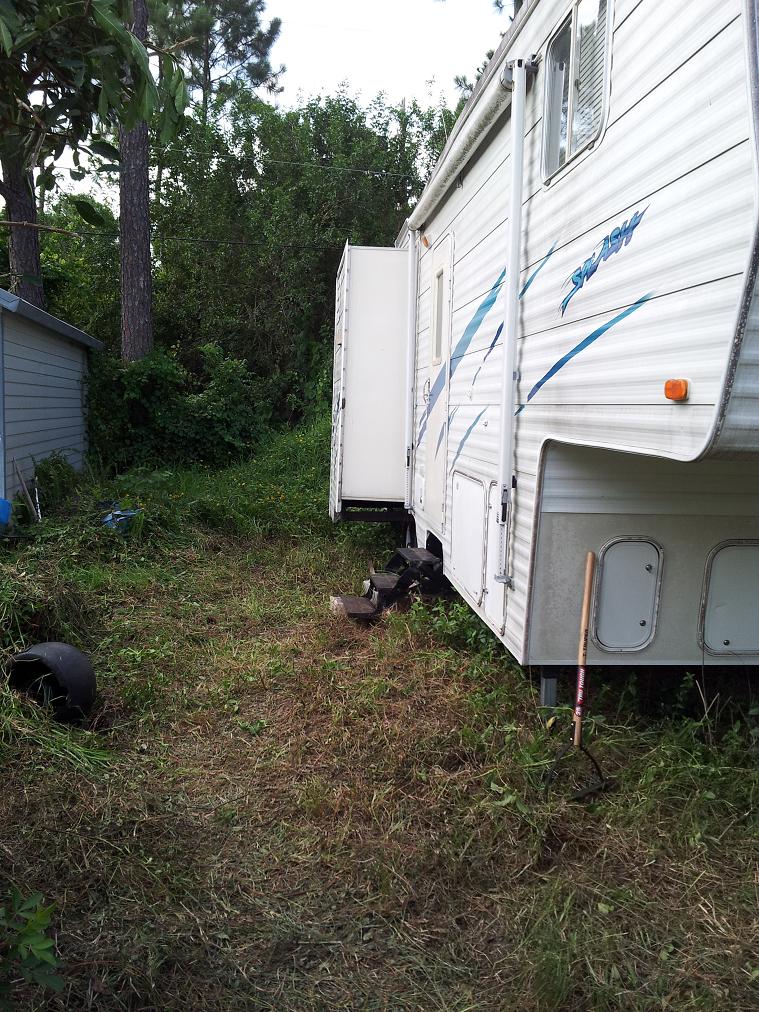
This is where we started, the trailer has been sitting in this same place since I parked it there for Dad a couple years back (or so I thought - turns out it was "loaned it out"). To cut a swath to the trailer, first I try using my old hand "weed cutter", but it's too old, rusted, and dull to make any progress. So one trip to store later, the new one makes better progress, but is still slow going. As you can see above, at least there's a swath cut down around the trailer. (7/4/12)


Here are some snaps of the inside before we got started. You can barely see the water damage in these thumbnails, but click them to enlarge and see just how long the leaking slideout roof was allowed to continue to cause damage. Most obvious is where the water sat in front of the couch and leaked out from where it was trapped beneath the bench in the corner. (7/4/12)


So more snaps of the interior, places that will have to wait until the major damage is repaired before they receive any attention. The floor in front of the bathroom on the way to the bed is rotted too, but it can wait for now. (7/4/12)


It's beer-thirty at Stew's Campground... Time for a party! (7/7/12)


The corner cabinet is finally out, as well as one of the benches, and now it's obvious how everything is just mounted on top the carpet. Eventually had to move the cabinet to the other corner and the benches go in the shed for now. (7/7/12)


The severity of the damage is becoming more apparent as the carpet is removed. The daylight showing through the floor from outside is the biggest issue. Turns out the floor is one monolithic piece of 7/8" oriented strand board (OSB) 10' long. Know any place that carries any chunk of wood that size? No? Me neither! Good luck with that... Guess I'll have to glue a couple 4'x8' sheets of plywood together. :( (7/8/12)


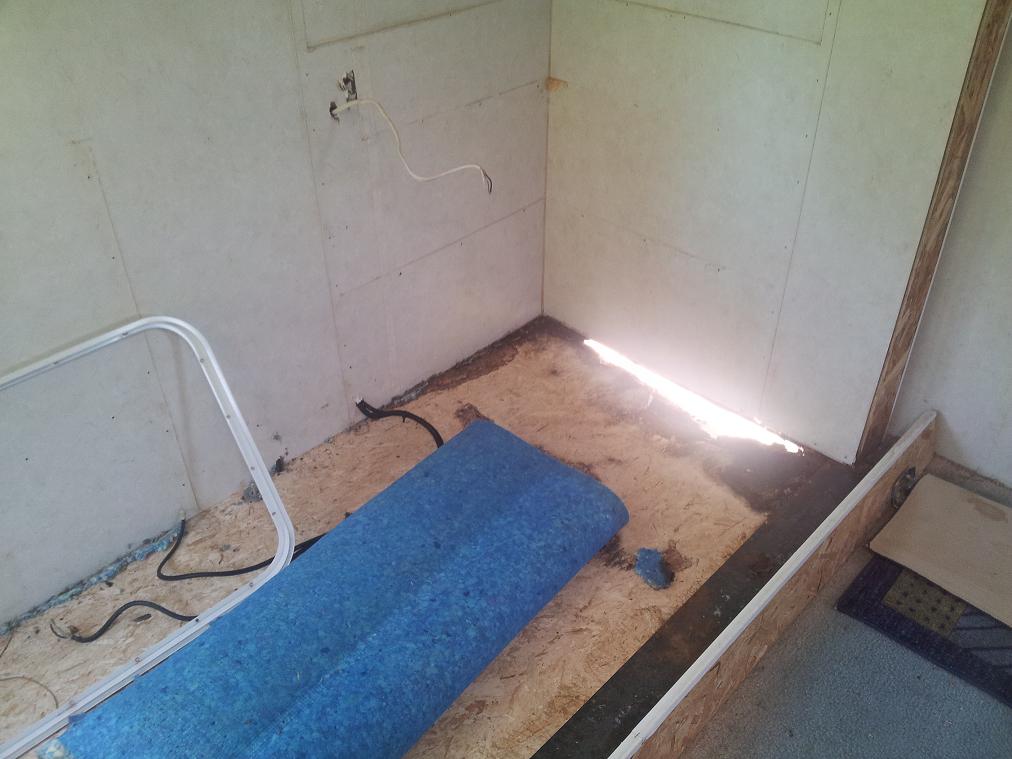

The more we remove, the more damage becomes visible... (sigh) (7/8/12)


By now it's apparent not only does the floor need replaced, but most of the slideout framing and wall covering will need replaced as well. So much for just patching the floor and moving in! (7/10/12-7/12/12)

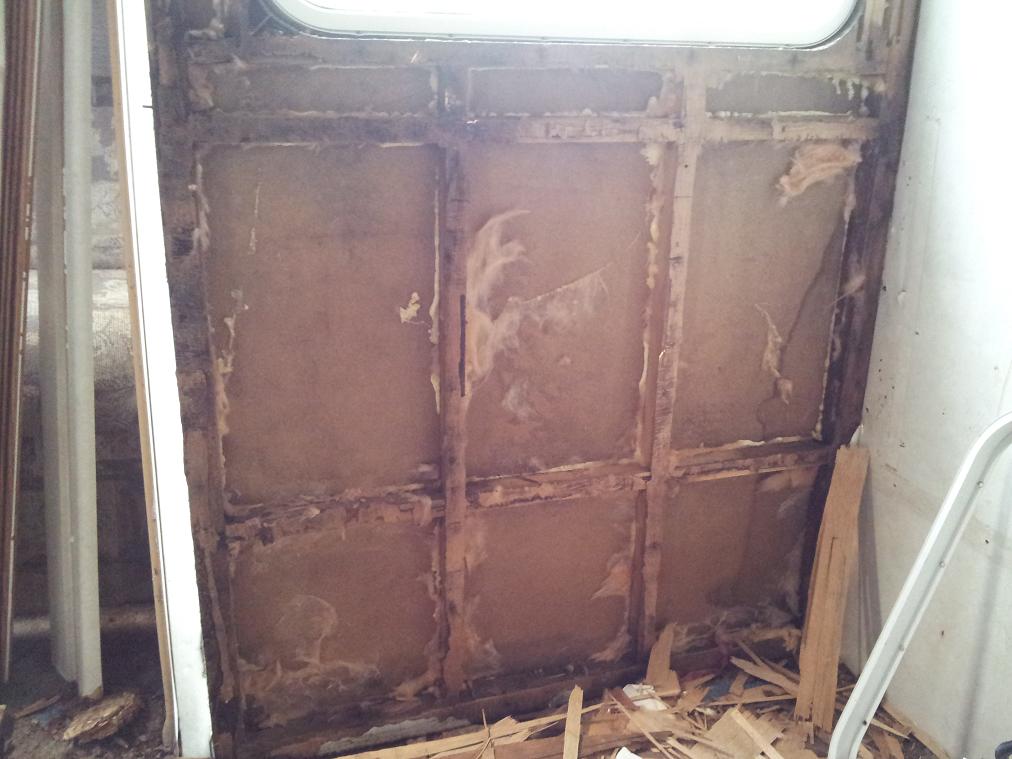


More and more and more damage... (sigh) (7/14/12)
The "Bus Stop". (7/14/12)


Certainly can tell it's Hurricane season. (7/17/12)


Back to work after a weekend off due to weather. (7/28/12)


Our Labor Day "Trailerthon". (9/1/12)


Our Labor Day "Trailerthon". (9/1/12)


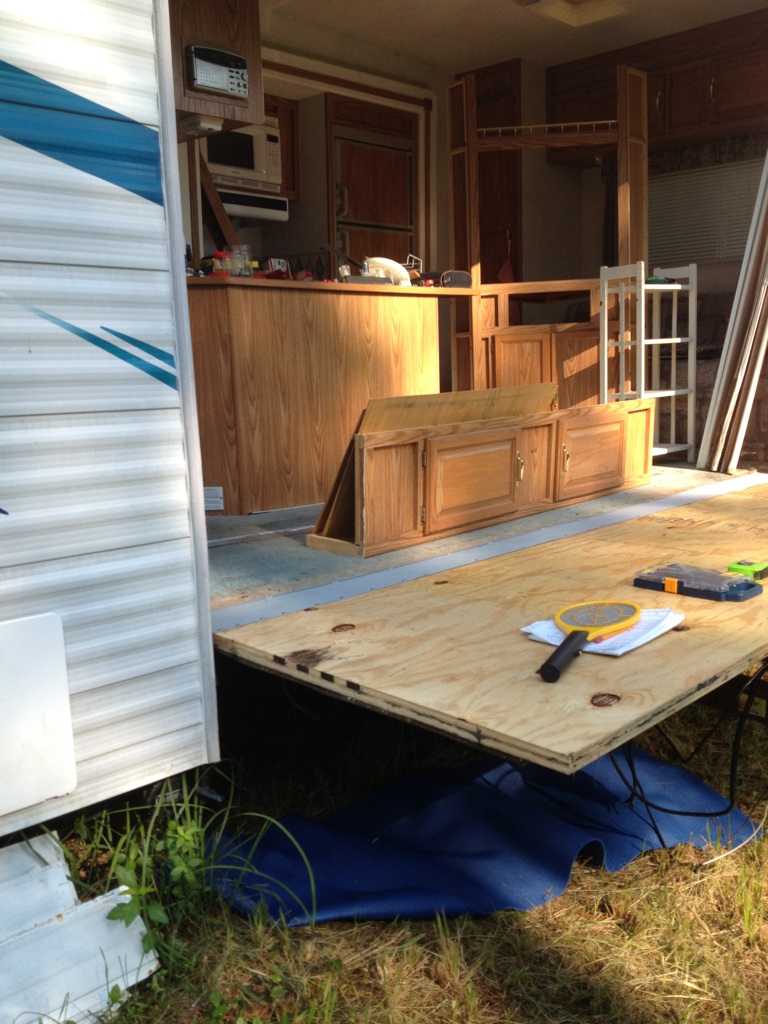


Our Labor Day "Trailerthon".(9/1/12)


Trimming out the insulation and installing interior panels. (9/2/12)
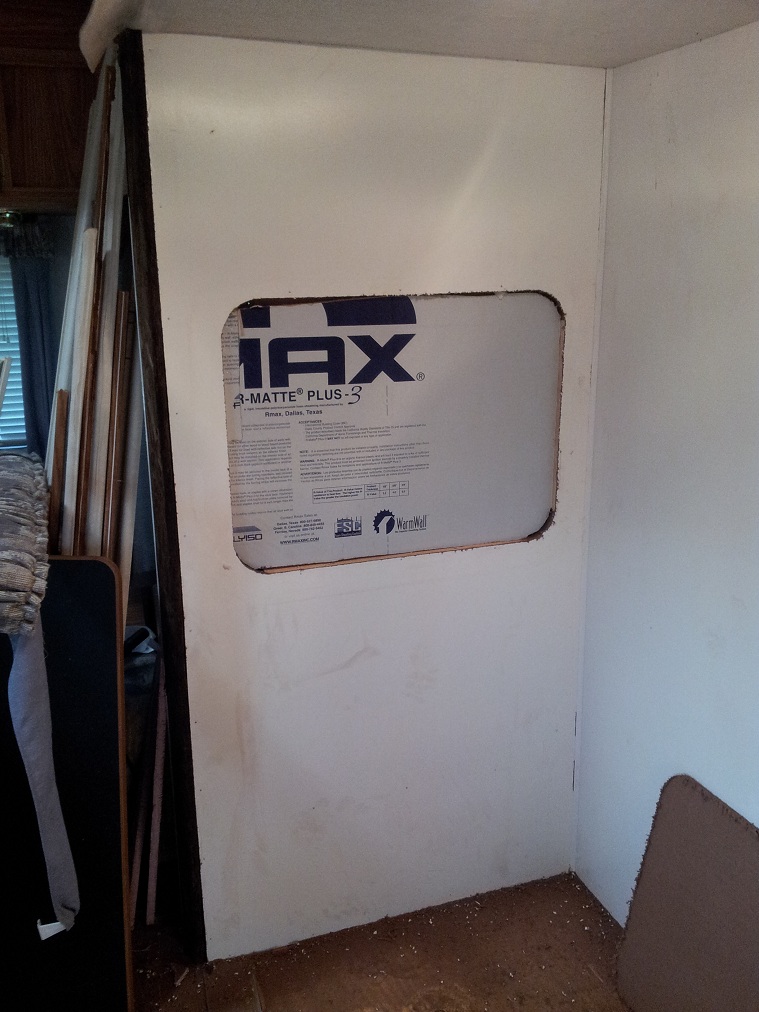

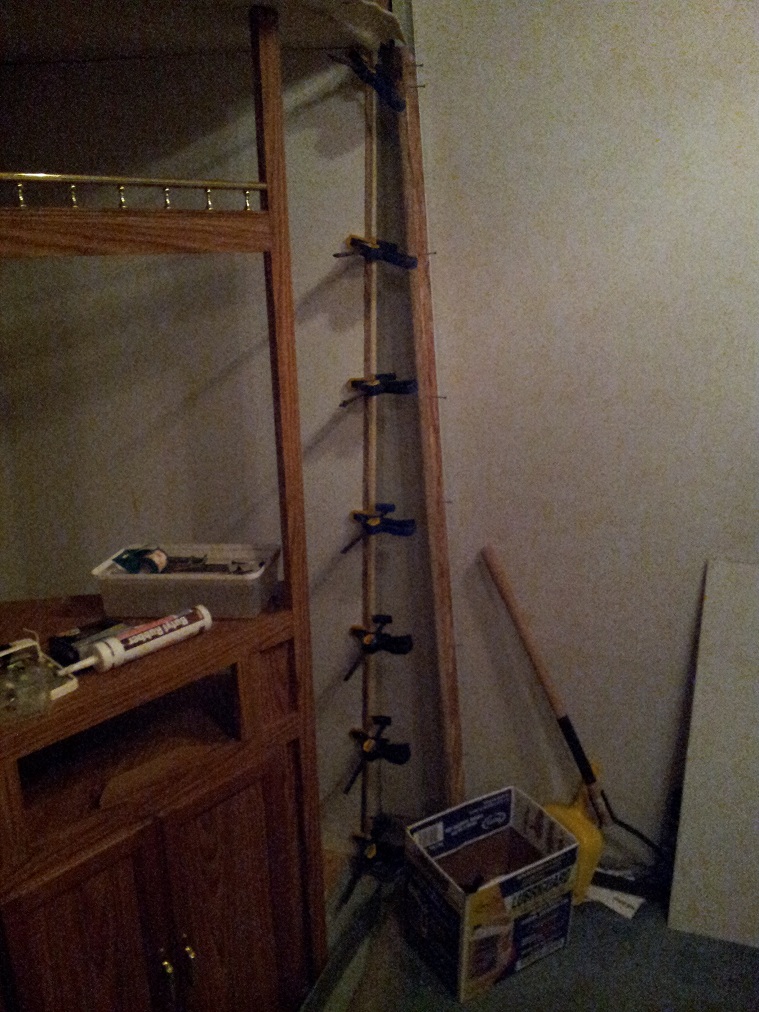

Cutting out the inside window opening and installing the remaining panels. (9/3/12)


Finishing the outside eletrical and prepping for siding installation. (9/8/12)


Finishing the outside siding installation. (9/9/12)


Preparing the fenderskirt mounts. (9/11/12)


Preparing the new fenderskirt. (9/13/12)


Interior installations... Carpet stretched and installed allows corner cabinet installation. Overhead cabinet installation came first, after outside siding up, made possible by adding new 2x4s to catch the screws from the inside. Previously held in place by screws from the outside. (9/17/12)


Filling in the low spots and preparing the patio block installation. (9/24/12)


Dedicated water supply installation. (9/27/12)


New faucet to go with the dedicated water supply. My (supposed) vortex fan arrived a month ago... Had to send it back. Second try arrives... It's STILL not a vortex fan! Have to send it back again! What a bunch of morons at AdventureRV! No trying to make it right. No discount on future orders. Nothing but a sorry about that. Dad's birthday cake. (10/2/12 - 10/12/12)


Christmas decorations. (11/30/12 - 12/2/12)


Christmas decorations. (11/30/12 - 12/2/12)