Our 2015 Side Porch Reconstruction At The Nest
(November 2015)
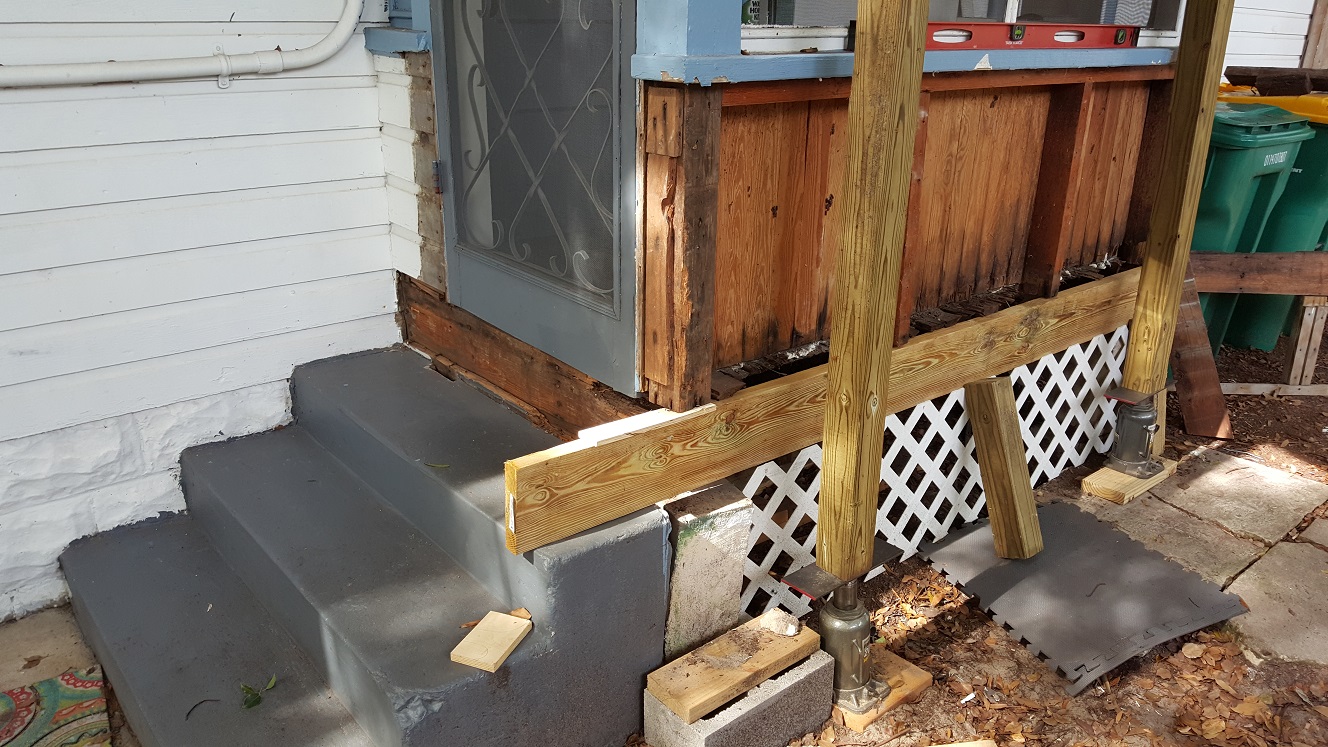
We've been slowly addressing the issue of the side porch. I was a bit irritated with Ann and Nick for removing the chunks of concrete
along the one corner support pier, because ever since then, the water running off the roof is slowly washing away the dirt and further
undermining an already serious problem. The side porch could fall off the house at any moment! Alright, perhaps that's an exaggeration,
but it has already pulled away from the side of the house more than a few inches and something needs done before it gets much worse. And
that means
jacking it up off of the support piers, providing support for the roof and remaining structure, while we replace the rotted structure.
First we'll need to address the major tilt of the piers themselves, and once trued up and plumb, then we can start by replacing the very
badly rotted ledger along the driveway facing side.
It's kind of an interactive thing. Adjust the pier. Check the ledger for level. Adjust the pier. Check the ledger for level. Finally getting to the point of needing to cut the ledger to size and fitting it in place. But that's difficult to do with all the rotted flooring and posts staring at us still.
Gotta love how rather than fix the problem, they just cut the bottom of the screen door going downhill instead. SMDH! Now I get to chisel out around all those nail heads to get under them and pry them out. If the garage wasn't put together with 16p nails, this porch framing certainly was! This is going to take longer than I wanted, but this rotten header has to come out too.
Over the next few weeks, basically over Thanksgiving break, I manage to get all the rotted structural members replaced and the new flooring installed. I've been using SketchUp to electronically draw out the plan for attaching a new screen door and installing the new vinyl windows. The windows were fairly straightforward, but I have three different plans for the screen door, depending on where the hinges are placed and how much space to leave on the jamb side. My concerns are twofold: First, the trim and other considerations may be easier to implement in one configuration vs. the others; Second, I need to cut the last flooring member to allow the hinge side stud to be installed and correctly rough in around it. I screwed that part up, but because I mismeasured it, not because the plan was wrong. SMDH!
The next step will be to remove the rest of the shiplap I hadn't already removed to gain access to the rotted parts of the structure. Most of the studs in the short porch wall need replaced, and that's difficult to do when the siding is still nailed to them. The old screens sitting on the 2x8 cap rail need to come out before we can put the new windows in as well. At some point I decide the 2x8 cap rail needs to go too, but I'll need a replacement.
I rip a new one using the table saw. A new one with a slope cut into it. A slope to act like a sill and allow any water to run off and not sit and accumulate next to wood I don't want to rot. Eventually I have everything roughed in and install the new vinyl windows.
(December 2015)
I want to have this done for Ann as a Christmas present. At least the outside. The inside is going to take a bit more doing. I already
had to rip out the silly @$$ed "closet" that enclosed the electrical panel, presumably to "protect" the NM romex wiring just stapled
to the house siding, just to be able to get the old floor boards out. Unfortunately, that exposed the half @$$ed job of rewiring, with
romex hanging through holes in the porch ceiling and into the side of the panel, now with no protection at all and totally exposed to
the elements.
That would have to change. Nick helped me to get all the wiring pulled back out and run down inside the wall to emerge form within the panel and not hanging outside of it, exposed. Not having that stupid closet thing really opened up quite a bit more room. I used that to my advantage when planning out the rest of the inside trim, but that's a ways off yet. I'm still working on getting the screen door and windows installed.
Shiplap has to go back on too. And new trim needs cut to fit the new windows and "sill". Thankfully Ann decides she wants me to put another window in the back wall, before I start to build that wall and the built in shelves.
I barely manage to get all of the trim back on by Christmas, but I do. It looks nice, but there's still plenty more to go. Like the new window and the rough in framing to go with it. And more trim, but I'll have to change my plans now. Ann doesn't want to reuse the piece between the outside of the house and the screen door that I'm using now. I'll have to see if I can somehow make shiplap work.
(March 2016)
Getting all the design work done takes even more time, and Ann is getting impatient with the lack of progress on the porch interior.
Whether I sketch it out using pencil and paper or on a computer screen, I really need to figure out the best approach for the trim
and the beadboard.
It probably doesn't help that I'm actually making progress on the garden railroad. I'm spending more time on that than planning the porch.
To make it all work, I have to reuse most of the original beadboard, cutting off the rotted bottoms and depending on the baseboard to hide my "secret". I don't have to, but why not reuse as much of the original as possible? After all, it's probably a lot more rot resistant than anything you can buy these days.
I still end up having to buy some new to make up for those that were too far gone to save. I finish the trim design using shiplap and it even incorporates some small built in shelves where it otherwise would have been wasted space. I'm able to get everything cut to size and fitted. The shiplap backed by those built in shelves is proving difficult, but eventually I figure out a way for it to all go together. All that remains is to paint it then install it.
The beadboard and baseboard will take slightly longer.