Our 2017 Bathroom Flooring
<< Previous | Bathroom | Demolition | Reconstruction | BathTub | Flooring | Tile | Next >>
(25 February 2017)
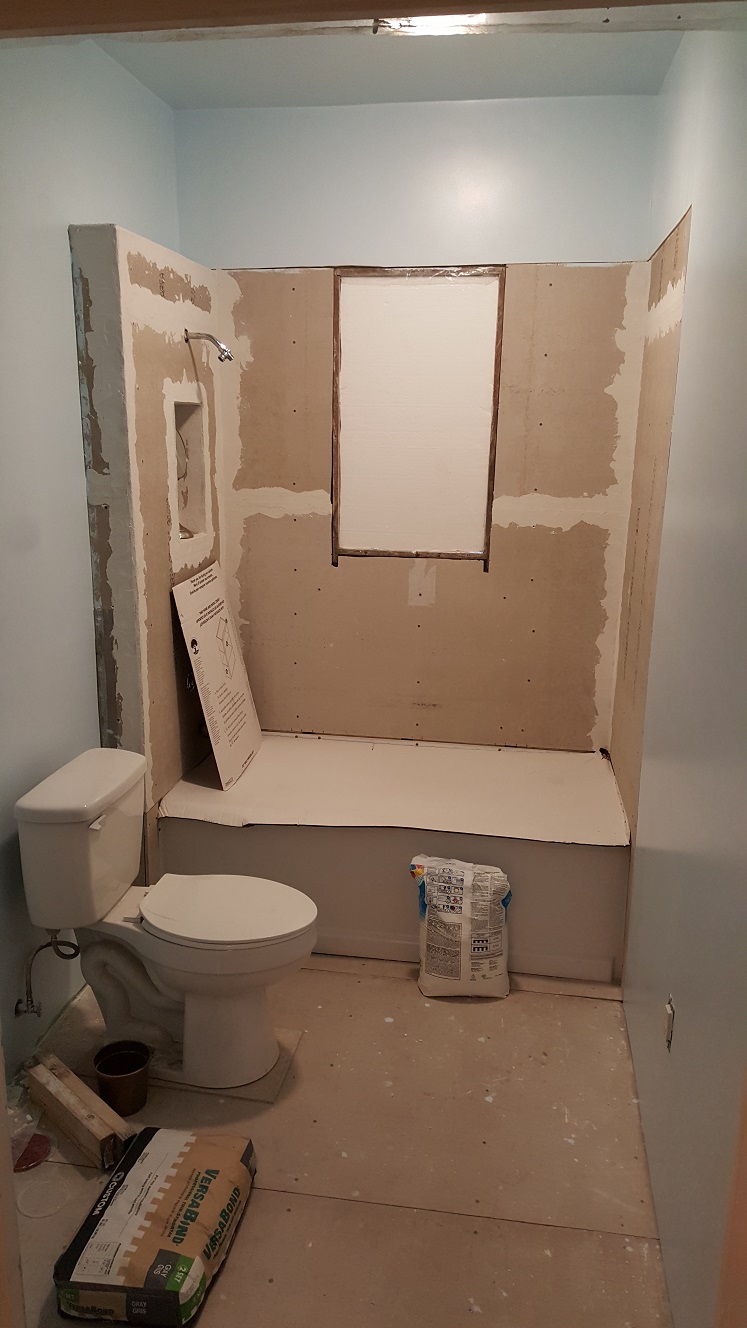
So the week went by quickly, I finished the rest of the drywall work, closing out the wall and plumbing, now roughed in
for the new pedestal sink. All the walls, the ceiling, everything painted. The next thing to get busy on is the floor tile.
Before I can get to that, I need to get the
sub floor ready for tile. Until the tile is ready to go down, I'm not taking the toilet back off the flange. Luckily,
it doesn't need to come off just to
layout the floor tile. I've already measured and cut the opening for the toilet flange in the ¼" backer board,
and have it and the remaining pieces installed in no time. The toilet is already sitting on an extra ¼" piece to
simulate the installed tile height.
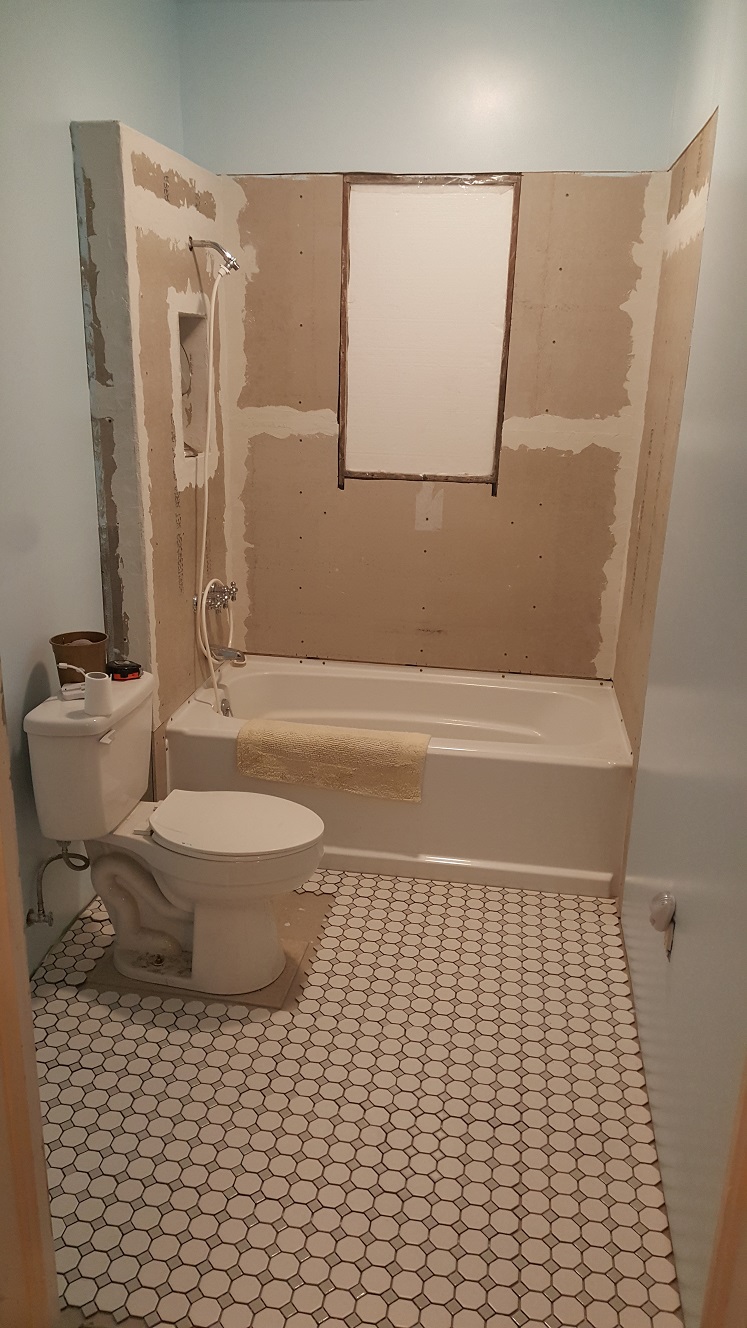
The idea of laying out the floor tile is to try to minimize cuts, but this style of tile is really too small to not have a lot of cuts, so I opt for a solid line along the long wall the towels will hang on. That way the cuts will be on along the wall that has plenty of view blocks, like the sink and toilet. Besides, the baseboards will cover any hiccups. The only place I have to be close to perfect is along the front of the bathtub, and the only difficult spots will be around the base of the tub where the chair rail tiles will meet the floor, if that's what I end up doing. Still having issues with the surround tile scheme, but more about that later.
Speaking of cutting tile, the only thing I have to make cuts with is a LARGE bridge saw that I used for LARGE floor tile, in the shed over at the other house. It's a monster, monstrously heavy and unwieldy, and better left over there in the shed. Even if I were to bring it over here, it would take up half the bathroom, and make a mess all over everything from slinging the contents of the wet sump that cools the diamond blade during cutting operations. I opt for a small portable version from Horrible Freight. Ann and Nick pick one up for me on one of their many trips to the new one that just opened up here in Mount Dora. They also pick up a 4" diamond tile blade, but it's the kind that is coated on either side, not on the tip of the edge of the blade. It should be good enough for the floor tile, but will leave too rough of a cut for the surround tiles.
Yeah, wrong! The blade is so rough on the tile I'm wondering if I shouldn't just go get the kind of blade I need before going any further. Again, since most of the cuts will be hidden by baseboard, the only place I'm worried about is in front of the tub. I'm not sure what to think... Are these tiles just more brittle because they're floor tile or just weaker or what? The finish cut has all kinds of little chips out of the glaze and looks rough. I guess time will tell whether it's good enough for the 5' test, I mean, unless you're right down on it you'll probably never notice it. That line will be caulked against the base of the tub as well, so that may help hide any obvious flaws as well. Maybe it's just me, but I would rather do it right the first time than have to come back later and correct it.
Looking back, I should have worried more about the thin set mortar and the grout. The mortar was thin, even for thin set. This style tile with the repeating pattern of small octagons and dots, glued together and on a mesh carrier on the back, allows one to set roughly a square foot at a time. This is nice because as long as you're good at aligning the next course to the last, it looks seamless... But, the thin mortar tends to "squish" up between the small tiles and the grout lines need constant "cleaning", i.e. running some sort of tooling through the grout lines between the tiles to leave room for grout. This makes things go a lot slower and it seems like no matter how hard I try to lay down a thinner bed of mortar, it's still too much?
I'm not sure if maybe this style tile amplifies the problem or what exactly I'm doing wrong. I'm sure that someone who does this professionally could probably tell me what I'm doing wrong, and I'd be happy for the feedback, but that's not helping me get it done now. I end up blindly pushing forward just to get this done. We're already two months into something that was supposed to take two weeks. I find out the hard way that was a mistake, as I'm down on my hands and knees for the next few days with a grout "saw", manually, mechanically "cutting" the now hardened mortar out of the grout lines. And even though I try my best to keep from cutting into the surfaces of the surrounding tiles, there's just no way humanly possible to avoid it.
I knew before I started this tile it was going to be more work than just setting standard floor tiles, but I had no idea how much more work... Chalk it up to experience at this point. So, grout you say? Yeah, that goes about as well as setting the tile. The grout is set in place using a "float" to push the grout into all the spaces between the tiles. Then that same float is run across the tiles at roughly a 45° angle to remove most of the excess without pulling it from between the tiles. Well, since the tiles are so small and have 45° angles everywhere, it's nearly impossible to run the float at an angle that doesn't try to pull the fresh grout right back out. But it gets better...
Once that grout has a chance to firm up some, usually within 15 minutes or so, it sets to a dull sheen over the tile. This needs wiped off with a sponge or rag or whatever before too much of the remaining excess grout hardens. Maybe an hour or two later the remaining dull haze over the tile can be "buffed" off using a towel. I don't know why I have such a hard time with this... But when I wring out the sponge I'm using to remove the excess grout, I can never get it quite dry enough such that it doesn't leave a puddle of water on the tile, re-wetting the grout and turning it into soup. Again, I don't know if it's just this type of tile amplifying the problem, but I end up having to regrout large areas where I have soup and not grout.
At the time, I think I have it under control... Wrong again. To this day there is a visible difference in grout "color", or rather, variations in the darkness of the supposedly light gray grout. Couple that with all the gouges in the tiles I made with the grout saw and it just might pass the 5' test. Sigh. Well, at least it's done and I can move on to what's left to do next.
<< Previous | Bathroom | Demolition | Reconstruction | BathTub | Flooring | Tile | Next >>
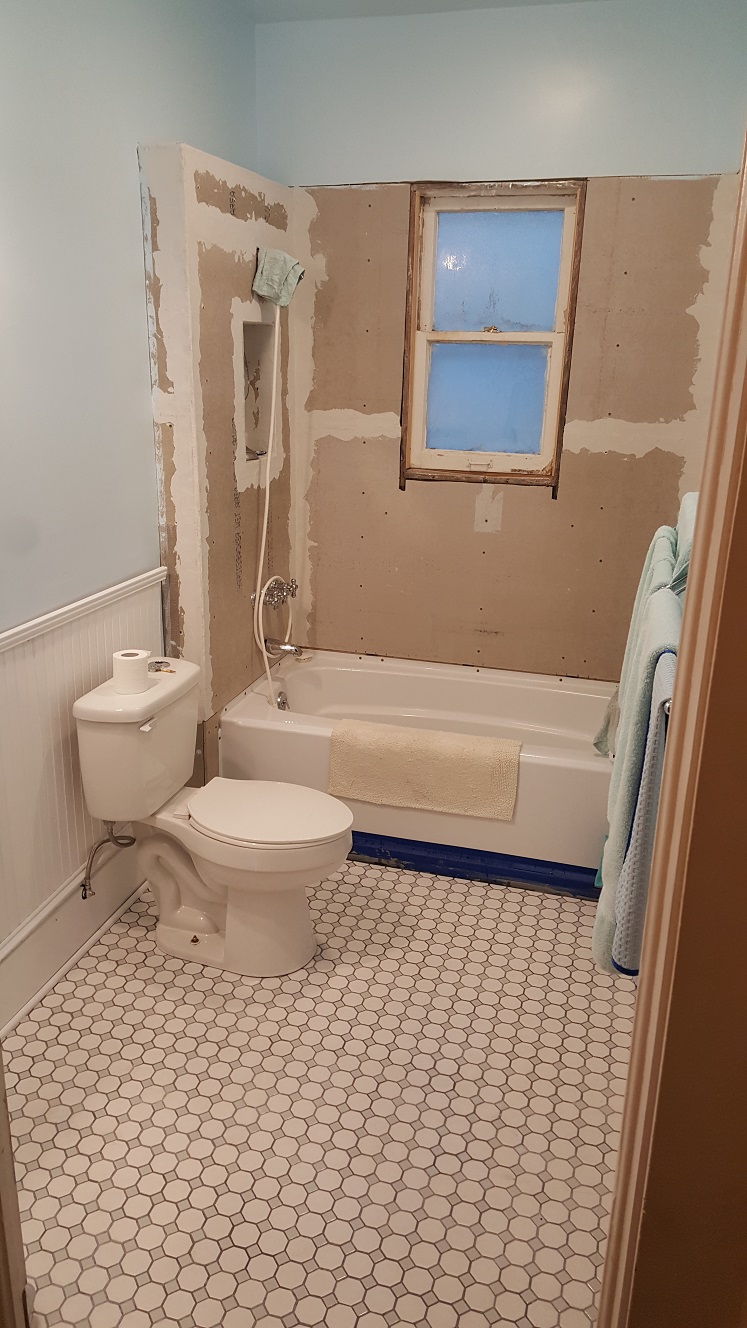
So Ann wants to put up baseboard and beadboard, not the base cove tile we had planned on. Well, that's certainly doable, and what I wanted to do to begin with, but... As I'm trying to rough fit the baseboard, I realize I've only set the toilet supply high enough to clear a 6" base cove tile, not a 7½" tall 1" x 8". I'll have to drill a hole in the baseboard and plumb through it. Not the best situation, in fact, one I should have avoided to begin with. Back to paralysis by analysis or jump in and get it done. Compromise after compromise on this project... Oh well, not the end of the world, but not the way I want to get it done either.
(20 March 2017)
The floor tile is in and has been for a couple weeks now. I've been concentrating on the beadboard wainscoting and
remaining fixture installations. I have to rough in the woodwork for now, that is, until I know where the surround tile
will end. Cutting that hole in the boaseboard is killing me too, but it has to be done to keep moving forward. Another
chalk it up to experience moment. The nice thing about all of this is I know I have enough "meat" behind the woodwork to
hold it in place, and where exactly it is. I'm using a handful of trim screws rather than a box full of nails to hold it
to the wall. If I didn't have to take it all back off to install the surround tile I probably would have just used nails.
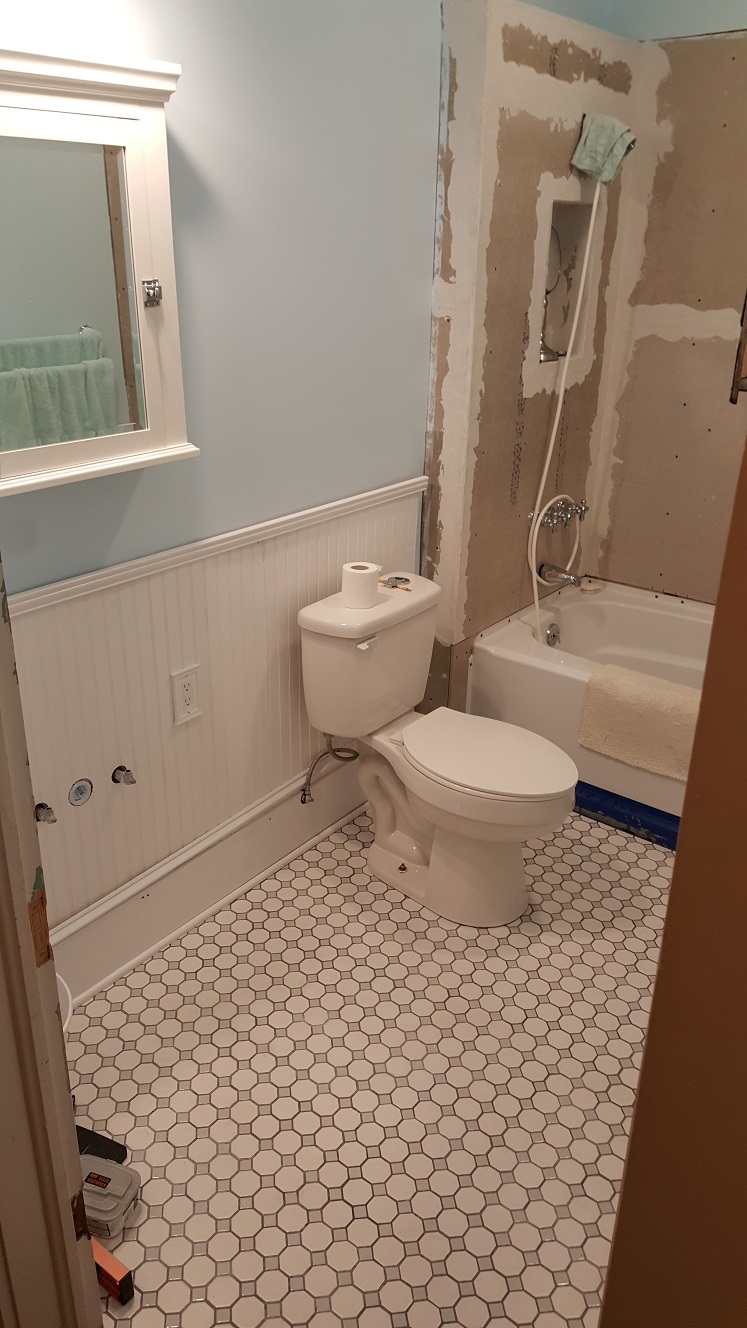
I cut all the pieces to fit, easy for a piece of baseboard that extends the length of the opening, not so much for the beadboard. I had to figure out the best cuts for the limited material I had on hand, i.e. how to land the seams on an underlying stud to avoid that, oops I missed and just went straight through the drywall effect. I had already given everything a coat of linseed oil to seal the wood to the moisture it was likely to encounter at some point in the future. Other considerations include electrical outlet and plumbing location cutouts in the beadboard, coping the trim pieces for the inside corners, and a quick touch up of all the freshly cut edges with linseed oil. Once that had set for a day or two I gave everything a couple of coats of the white trim paint.
The cap molding for the baseboard must have aleady had a coat of some sort of primer/sealer because the linseed oil just stayed "tacky" and never seemed to dry. Trying to sand it just made it worse and gummed up the sandpaper. Oh well, the 5' test still applies. With everything coming together and starting to look a lot like the final design, Ann asked if we couldn't do something about getting the window back in, and getting rid of that big piece of styrofoam insulation that has been covering the opening. I had put together a "storm window" of sorts to take the place of the window screen to help stop drafts and better seal the opening from the outdoors. I still had some work to do on the sashes, but that shouldn't stop me from prepping the window frame and temporarily installing them.
After scraping most of the remaining paint from the frame, I glued any split or broken pieces, like the stop between the sashes and the access panel to the weight pockets. I cut some new stops for the inner sash and made a makeshift sill, from some pressure treated scraps I had left over, to accomodate what looks to have been previously cut from the bottom of the inner sash. I gave everything a coat of linseed oil and let it sit for a day. Then I installed the window temporarily until I can do more with the sashes, like strip the paint and glue the one loose joint, not to mention reputty the glazing. Oil based, acrylic, latex, silicone, what? More research needed...
The glazing itself still needs cleaned badly too, but I don't bother since we need some sort of privacy film or curtains or something, and the calcium build up is just the ticket for now. Also, I never did find that fourth window weight for the upper sash either, but once everything was in, it didn't seem to matter. It's good enough for now, and at least we can open and close the window for ventilation, that is, once I replace the storm window with the old screen.
The medicine cabinet and lighting are installed, but the light took some doing... Ann found a really neat old style light with chromed metal and dual glass globes, but because the medicine cabinet is surface mount, the globes don't extend far enough from the wall to do anything but shine down on the top of the cabinet. I have an idea of how to fix that but I'm having a hard time finding any straight thread versions of a chromed pipe. None of the lamp part sites have anything that's the size I need, if they have anything like that at all.
I finally give up looking for lamp parts with straight pipe threads and move to actual chrome plated brass pipe, with the standard tapered pipe threads. Oh look... Thousands to choose from! Wow. I order the parts and fittings I'll need to "rework" the fixture such that the light sockets will protrude far enough past the medicine cabinet to shine down over the sink. My only concern is whether the mounting base will handle having that much weight hanging 5" further from the wall or not. Once the parts arrive, I begin to disassemble the fixture into pieces then reassemble it using the plumbing pipe parts.
I soon find that the tapered pipe threads are very tight, perhaps due to the added extra thickness of the chrome plating? Unfortunately, because of this the way I planned to do this will not work, but I soon have a work around and the fixture is ready to hang. Now the big test, will the base hold the weight? Yes it will and it looks great! With that done, the sink is ready to go in. Well, once I install all the plumbing in the sink that is... Ann found a set of solid brass sink fixtures with the same style handles as the bath fixtures. And although they're made by different companies, they must have the same design staff that likes to make things difficult...
Or maybe it's just me making it difficult this time, but it just seems assinine to use braided flexible hoses to connect the valves to the spout? I decide these need to connect using copper lines. Yeah, about that... Once I get the valves and spout mounted in the sink, I see there's barely enough room to install those hoses. Worse yet, there is an offset between the valve outlets and the spout base inlets, perhaps to accomodate the hose end connectors? In any case, that offset means the copper will have to be flexible and be bent with a fairly tight radius. I ordered a set of tubing benders to avoid kinking the copper tubing.
Once I received them and tried to bend the tubing, I realized it wasn't going to work. First I tried bending it to directly address the offset, but it was too small a radius to bend that way. Next I tried making a loop, hoping that by allowing the radius to increase beyond the distance between the ends, just landing the ends where they needed to go it would work. Nope. Perhaps with a different style bender, or perhaps a mandrel roller, but this spring tube style was a waste of money. Add to that one end is a different size than the other and it's easier to go with the path of least resistance and just use the hoses that came with it. Sigh.
I get the door hinges mortised in for changing the door swing, as well as the striker plate, and just need to drill the jamb for latch clearance. Ann is stripping the paint off the door so it won't have layer after layer of age old paint covering it. She gets it as far as she can, and I decide to take over and get all those intricate details clean. She very much appreciates it. I couldn't see just leaving them messy after going to all the trouble of stripping the paint off of every other part of the door. Ann is right, it makes a world of difference too! Even with it painted, you can actually see the grain of the wood showing through, at least the variation in depth.
That leaves just the surround tile remaining. Well, that and the window sashes... But I'll get to that in the next section.
It's Really Starting To Come Together Now...
<< Previous | Bathroom | Demolition | Reconstruction | BathTub | Flooring | Tile | Next >>