Our 2017 Bathroom Reconstruction
<< Previous | Bathroom | Demolition | Reconstruction | BathTub | Flooring | Tile | Next >>
(2 January 2017)
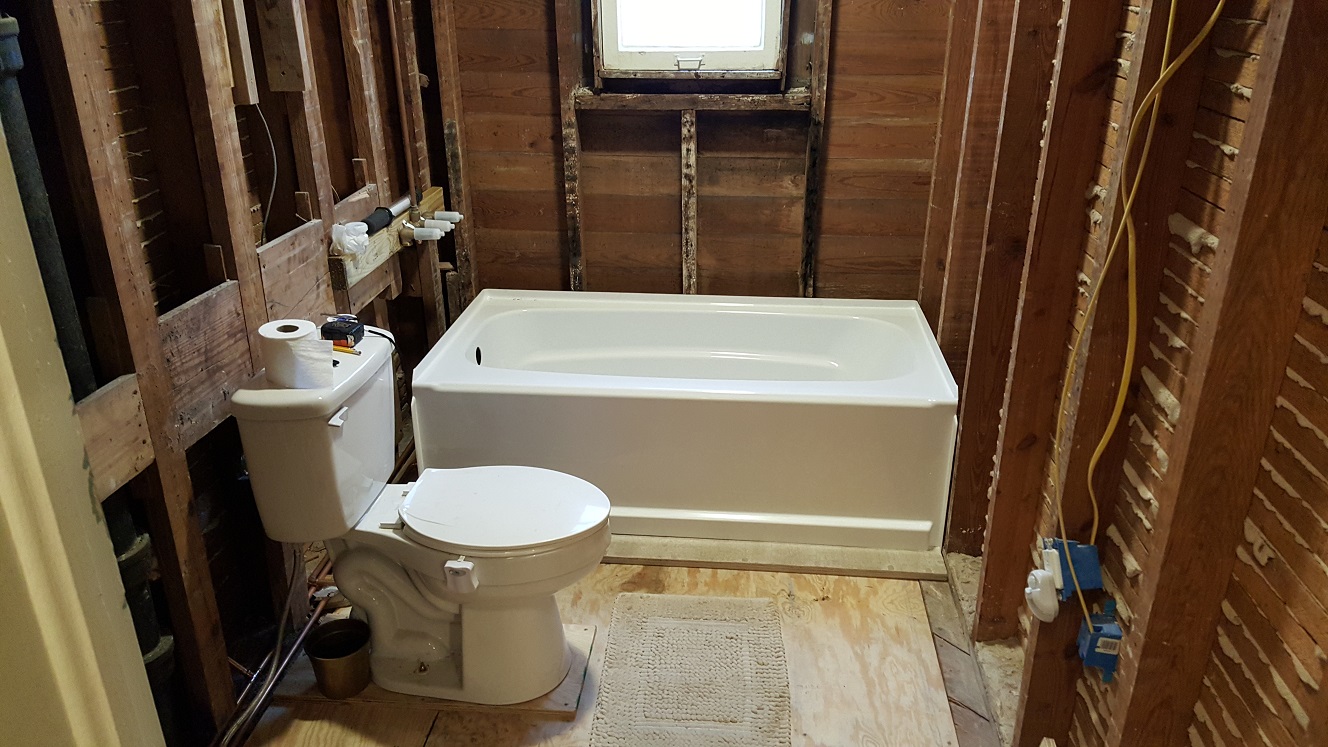
Time was running out. As I expected, we barely got the new subfloor in place by the end of our Christmas break. With the
hardie backer board loosely on the floor, we set
the new super soaker tub in place to get an idea of what we needed as far as roughing it in, just before we went
back to work after the break. We did get some other things taken care of here and there, but basically we had a new
subfloor, solid and level as we could get it. Still just
a throne room though. My biggest concern is about the remaining damp rot on and around the window frame and the studs
beneath it. The studs I can easily do something about, but the window frame itself and the state of disrepair it's in
could turn into a major headache real quick. For now that will have to wait.
(16 January 2017)
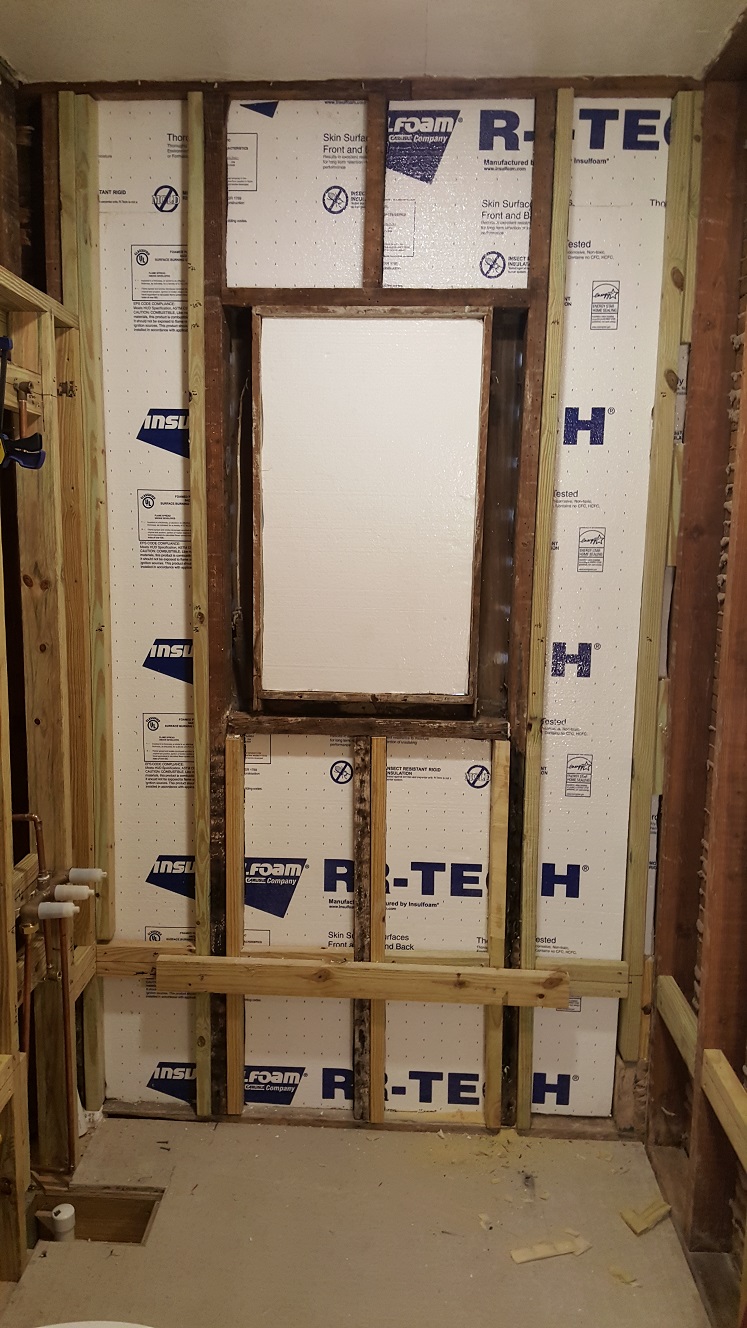
Over the last few weeks we've continued our work on the bathroom reconstruction. I've doubled up the outside wall studs,
daughtering them with new pressure treated 2x4s. I wanted to avoid having to cut out the old, damp rotted ones,
opening up a major hole in the side of the house to do so. I'll probably have to replace the bottom courses of shiplap
someday, but today is not that day! Besides, the old studs weren't entirely rotted, just the parts where moisture was
held to them by the inside wall covering. I was able to somewhat reconnect what was left of the right side of the window
frame that I thought I would have to fabricate an entire new piece for. It will do for now and if I have to do anything
more with it in the future I can access the entire frame from outside the house by just removing the trim, without
disturbing the inside too much.
By reversing the swing of the bathroom door so that it would now open against the wall where the new towel bars would hang, we freed up the space that would have been behind it for a pedestal sink Ann's always wanted. I need to come up through the wet wall base plate from below with the new copper supplies and then follow along the floor to the other end of the bathroom. It's kind of hard to describe, but it appears that back in the day the way they made sure there was enough room for the vent stack and proper ventilation to rid the wall of any dampness was to put another stud flat against the regular stud to form a sort of "tee" arrangement, leaving an opening at the top of the wall into the attic. I'm not quite sure why, but those flat studs stopped short of the floor by about the width of a stud, leaving a little "pocket" the size of a stud behind the wall covering, enough room to run two lengths of ½" copper pipe.
All that said, my plan is to just come off of those two pipes with tees for the sink and toilet supplies, then down at the tub end just use elbows to move out into the bulkhead then up into the bottom of the control body. Of course we'll have to have that all finished and working before we can cut the old toilet supply line. But catch 22, before we can have the new plumbing all working, we'll have to cut into the old cpvc cold supply line. So we'll do the hot water first since it won't really affect the cold line.
I've roughed in just about everything that I can and even soldered up most of the new copper plumbing. The worst part is trying to figure the rough in dimensions for the new brass Price-Pfister bath and shower controls. It seems like no matter how I try to calculate where they should be placed in reference to the finished wall, I don't have enough information to know for sure until after they and the wall are installed. Let's just say I agonized over it longer than I should have. There doesn't appear to be a flat or a shoulder like I would have expected the brass control body casting to have. Next time I'll just make it so it's shimmed, can be shimmed out further, or have the shimming removed altogether.
As it is, I still can't solder on the brass compression fittings that draw up tight against the brass control body casting, not if I want to be able to pressure test the connection that is. Actually, most of what I've soldered so far can't be pressure tested yet, but at least I can get to it a LOT easier than if it were just beneath that new plywood subfloor! And some of it is lower pressure, like the shower head and tub spout connections after the control body. I haven't completed the copper splice into the old CPVC supplies yet. I'll need Nick's help to do that. The idea is to use a union coupling between the old CPVC supplies and the new copper lines running to the bathroom. That way when we finally get to remodelling the kitchen, I can finish replacing the rest of the CPVC with copper and run new copper supplies over to meet up with the copper we're installing now. Nick picked up some nice quarter turn valves for the CPVC side, before the CPVC to copper unions to make it easier to work on the plumbing later.
The biggest show stopper that I really need to finish is the new copper plumbing. We can't really go any further until that is complete and we are confident it will not leak. The last thing we want to do is get the tub installed only to find out there is a leak we can't get to behind it! With Nick's help I get the rest of the supplies cut in and soldered up. And of course the only connection I have a problem with leaking is the blasted hot water brass union fitting to the brass control casting... The one that would have been behind the wall and the tub and impossible to reach! These things are a PAIN IN THE @$$!!! Had I been using iron pipe, the control body is directly threaded for that. But the installation instructions specifically state NOT to use the solder on copper male threaded adapters to connect the copper?!?!?
First I had to unsolder and remove the smoking hot brass fitting from the copper pipe. Then let it all cool down and clean up the mating surfaces and reflux them. Then finally reflow the solder, adding some new solder and trying not to fill the copper pipe with blobs of it just melting, running off the not yet quite hot enough brass fitting, and dripping down into the pipe. I really thought I had it this time, but boy was I wrong! Great! Now it leaks worse than it did the first time, and I'm thinking I had one chance to get it right, blew it, and would just continue to make it worse and worse. Well, I had to unsolder and remove that smoking hot brass fitting AGAIN... etc., etc. Time to let things cool off, including myself, and try again in a bit.
<< Previous | Bathroom | Demolition | Reconstruction | BathTub | Flooring | Tile | Next >>
Thankfully it's the hot water and not the cold water or we wouldn't even have a throne room! I'm thinking that I just need to ensure even heating all around the brass fitting since it seems to still be cold even when the copper is more than hot enough to melt the solder. After once again cleaning the parts, this time using some sandpaper to smooth the solder left behind into a thin layer, and another coat of flux, it's time for round three. This time I concentrate my torch's heat on the brass and wait until it is hot enough to melt and flow the solder before I even get near the copper with it. It seems to flow much easier, although some of it still drips down into the pipe, but this time it actually looks like the entire joint all the way around is filled with molten solder.
This time I'm taking no chances. I'm not touching the joint or fitting until it cools naturally, thinking that my previous attempts at cooling it manually with a wet rag and disturbing it may have caused a cold joint. Crossing my fingers and I'm hoping the third time's a charm... And it is! Perhaps the previous attempts that provided continuous tinning may have helped the solder flow completely this time. Maybe not trying to force cool it and not disturbing it was the answer. All I know is this time that brass was hot enough to have a smudge of solder on the union's mating surface that I was afraid was going to cause a leak. Crisis averted. Good thing too because I already had to call Price-Pfister and get an entire new hot water valve under warranty, because it would not stop spinning, and they couldn't send me just the replacement stop! I was afraid I'd have to call them again to get another brass fitting, this time my fault.
Anyway, I'm glad to have the new plumbing installed and finally not leaking. Just to be sure it wasn't going to spring a leak somewhere, I didn't cover it for at least a week. I wanted to be absolutely sure I could trust it before installing drywall or hardie backer board over it. Because the new tub was one of those acrylic jobs, I didn't want to have to place a ladder in it, not knowing how concentrated a force it could or couldn't handle. The drywall above it will need installed and that and the ceiling will need textured and painted before the tub is installed to avoid that situation.
So the plan is to install the hardie backer board for the tub surround with the idea that the tub will just slide into place once all of the mortaring is done. The drywall needs installed above the hardie backer surround and the joints taped and mudded too. As always, I'm still agonizing over my tile planning and still no closer to knowing for sure what the actual pattern will we be, but more importantly, where the backer board ends and the drywall begins. I need to decide that before I can get started with the backer board on the wall around the window. I'll tell more about that in the next section...
The Reconstruction And Rough In Begins...